
This is a very picture heavy post, meant to be a sort of tutorial for my favorite way to do socks. Making socks toe up is my favorite method by far. I also make them two at a time and write most of my sock patterns that way. If you’re unfamiliar with this method it can definitely be confusing the first time around. Today I was working on a sock heel and musing about the first time I ever turned a heel, helped by the wise and wonderful owner at my LYS, and I remember how much it blew my mind at the time. I had never done short rows, so I was very confused. Cynthia talked me through the whole thing, and I’m eternally grateful for my endless sock obsession. These photos are meant to serve as an explanation for the transition from the heel flap to heel turn to picking up all the gusset stitches. See one of my patterns for more details in some areas.
Ok, let’s assume you’ve been eagerly working on a pair of socks. Maybe you did them both at once, or maybe one at a time, but either way, they’re toe up. When the tube of the sock reaches your ankle it’s time to make your heel flap. If you’re using one of my patterns this is the point I tell you to aim for. I like socks about 24.5 cm from toe to the end of my heel flap with about 7 cm of that being the heel flap. Heel what? This means you leave the instep (top) stitches alone for awhile and work back and forth on the heel stitches only. In my patterns that’s half of the stitches and this should be an odd number. Sometimes you might have to do a decrease right before you start the heel flap (or on your first row of the heel flap if you forget about it until the last minute). Heel flaps are made by combining knit stitches and slipped stitches to make the flap thicker for more durability. The WS row stitches are all purled. The slipped stitches are made by slipping purlwise with yarn in back (sl purlwise wyib). You make a beautiful thing that looks like this: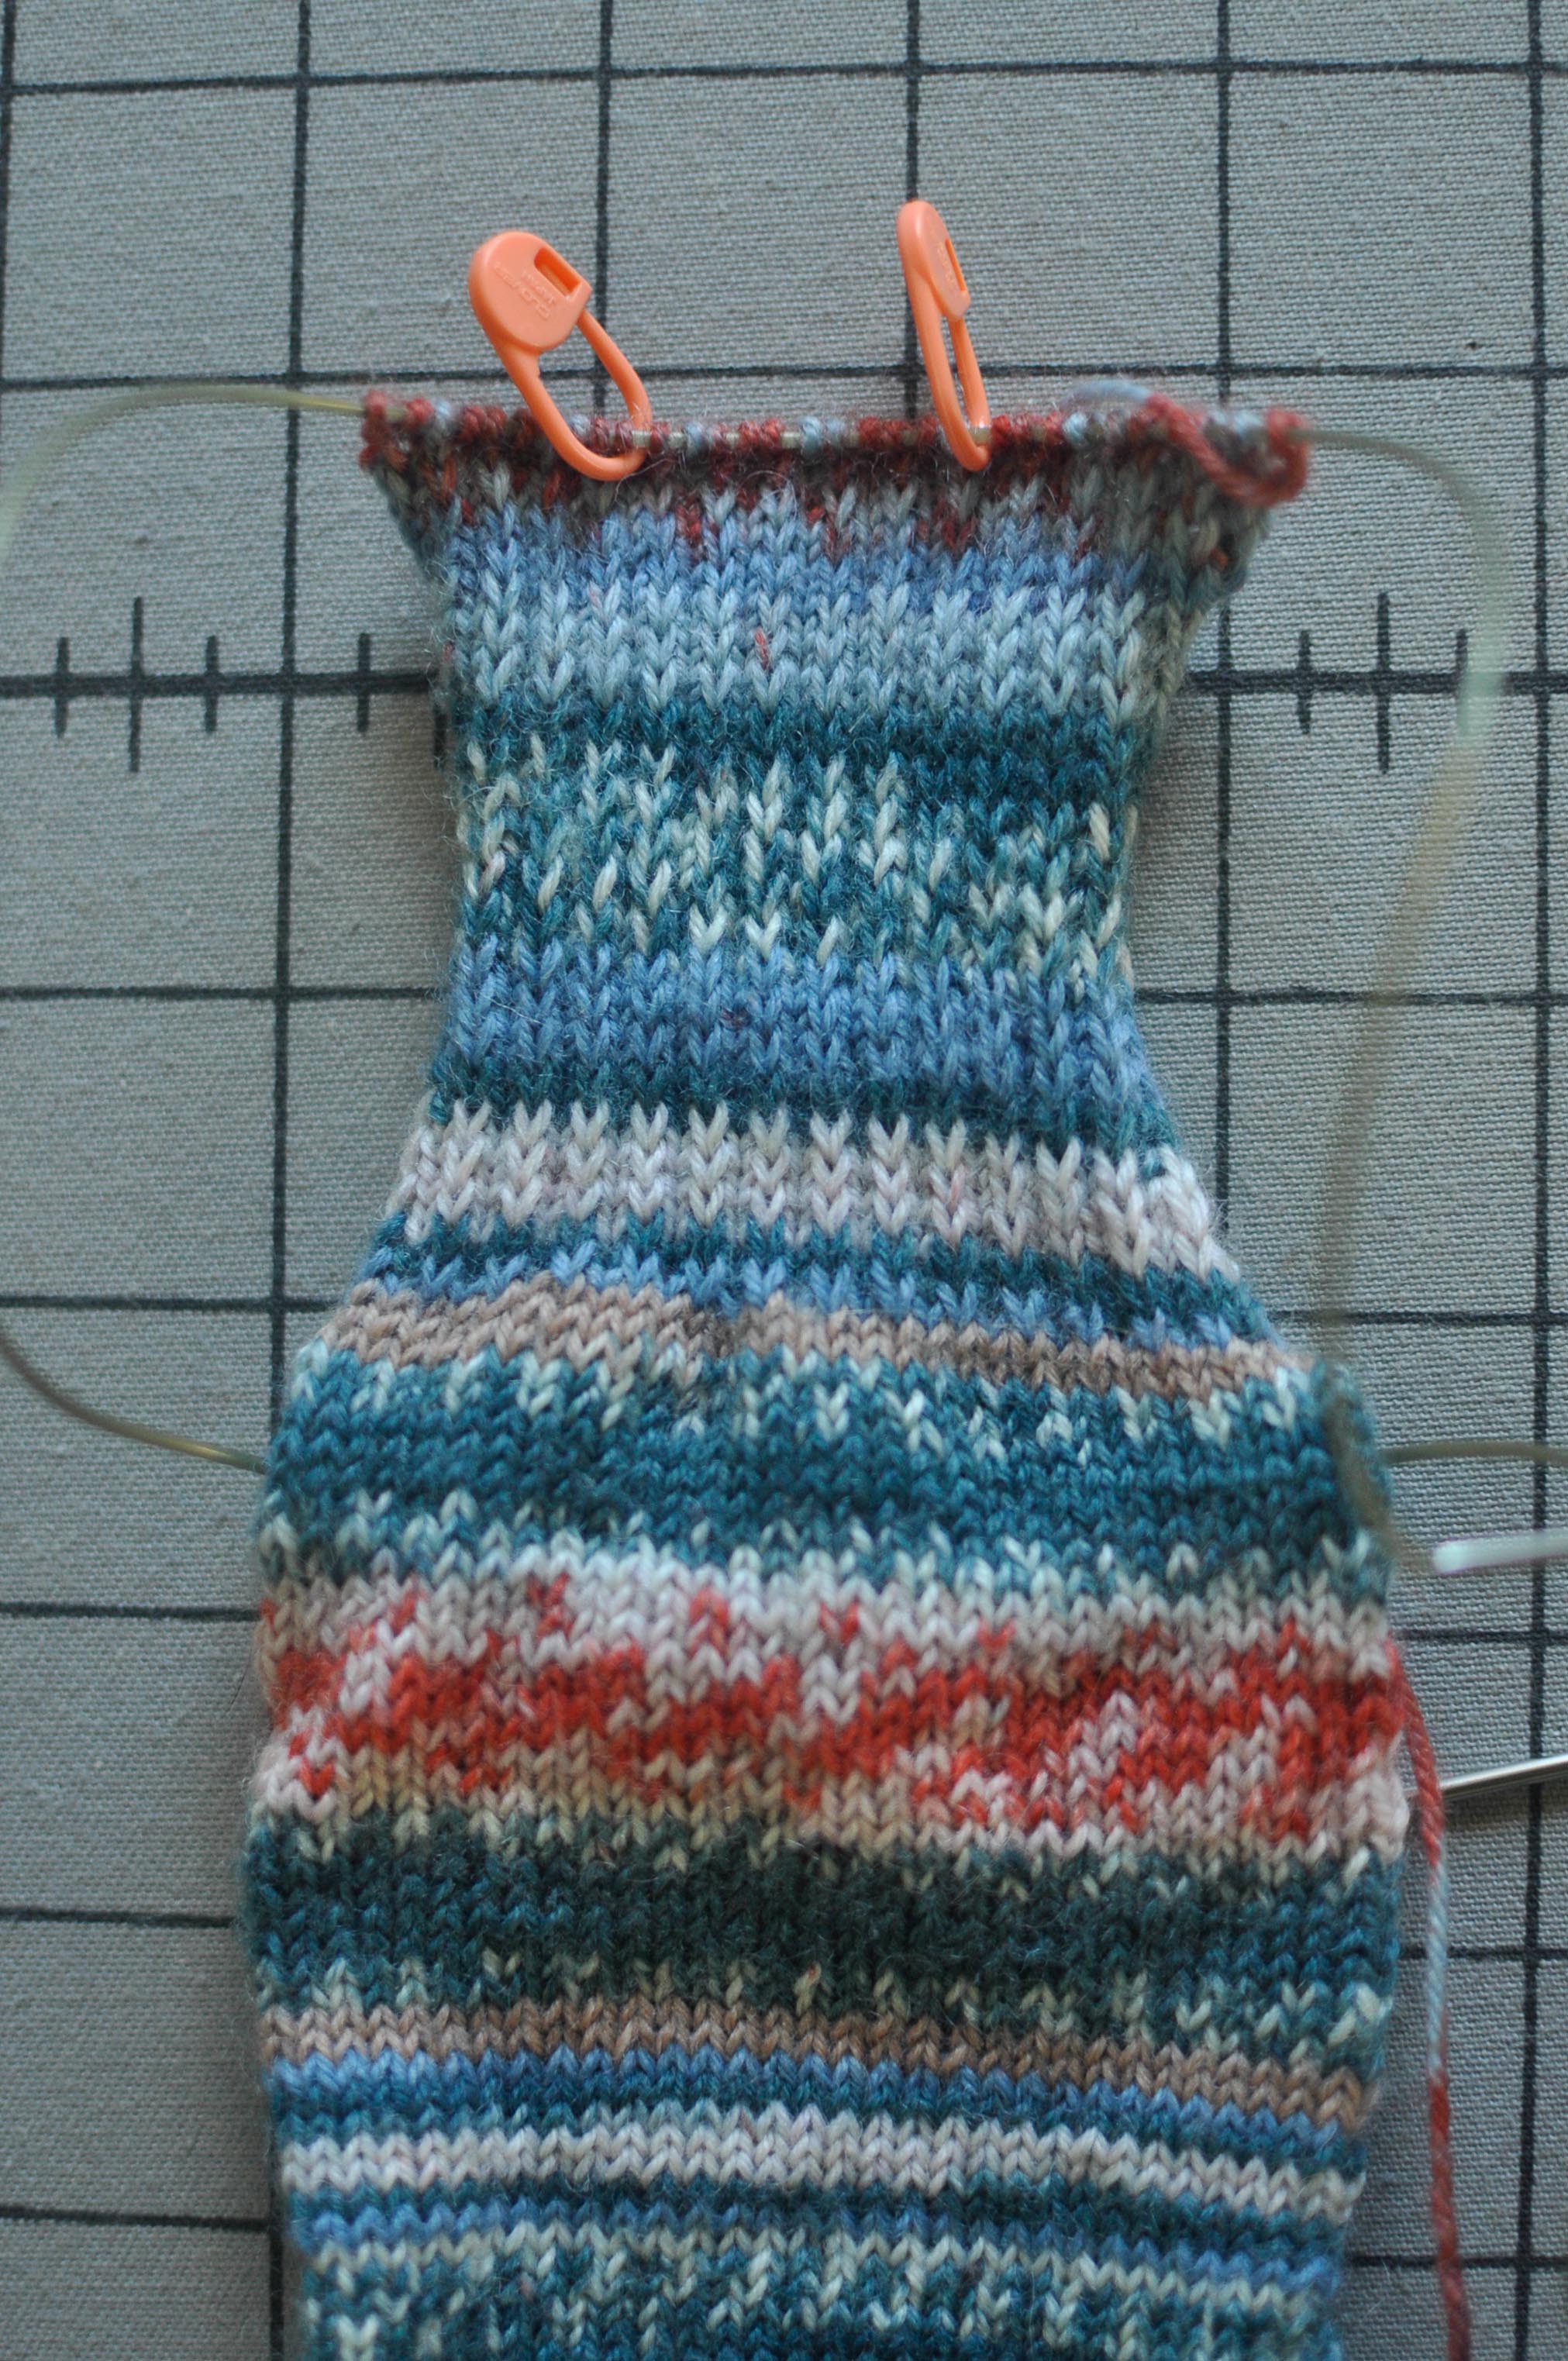 See the stitch markers there? This heel flap has 31 stitches and the markers are around the center 11. You need to mark off the center 1/3 (in my opinion) to get a good heel shape.
Now we’re going to turn this heel flap with some short rows. First you work in pattern (keep slipping and knitting on the RS and purling on the WS). Work until you get to the second marker. 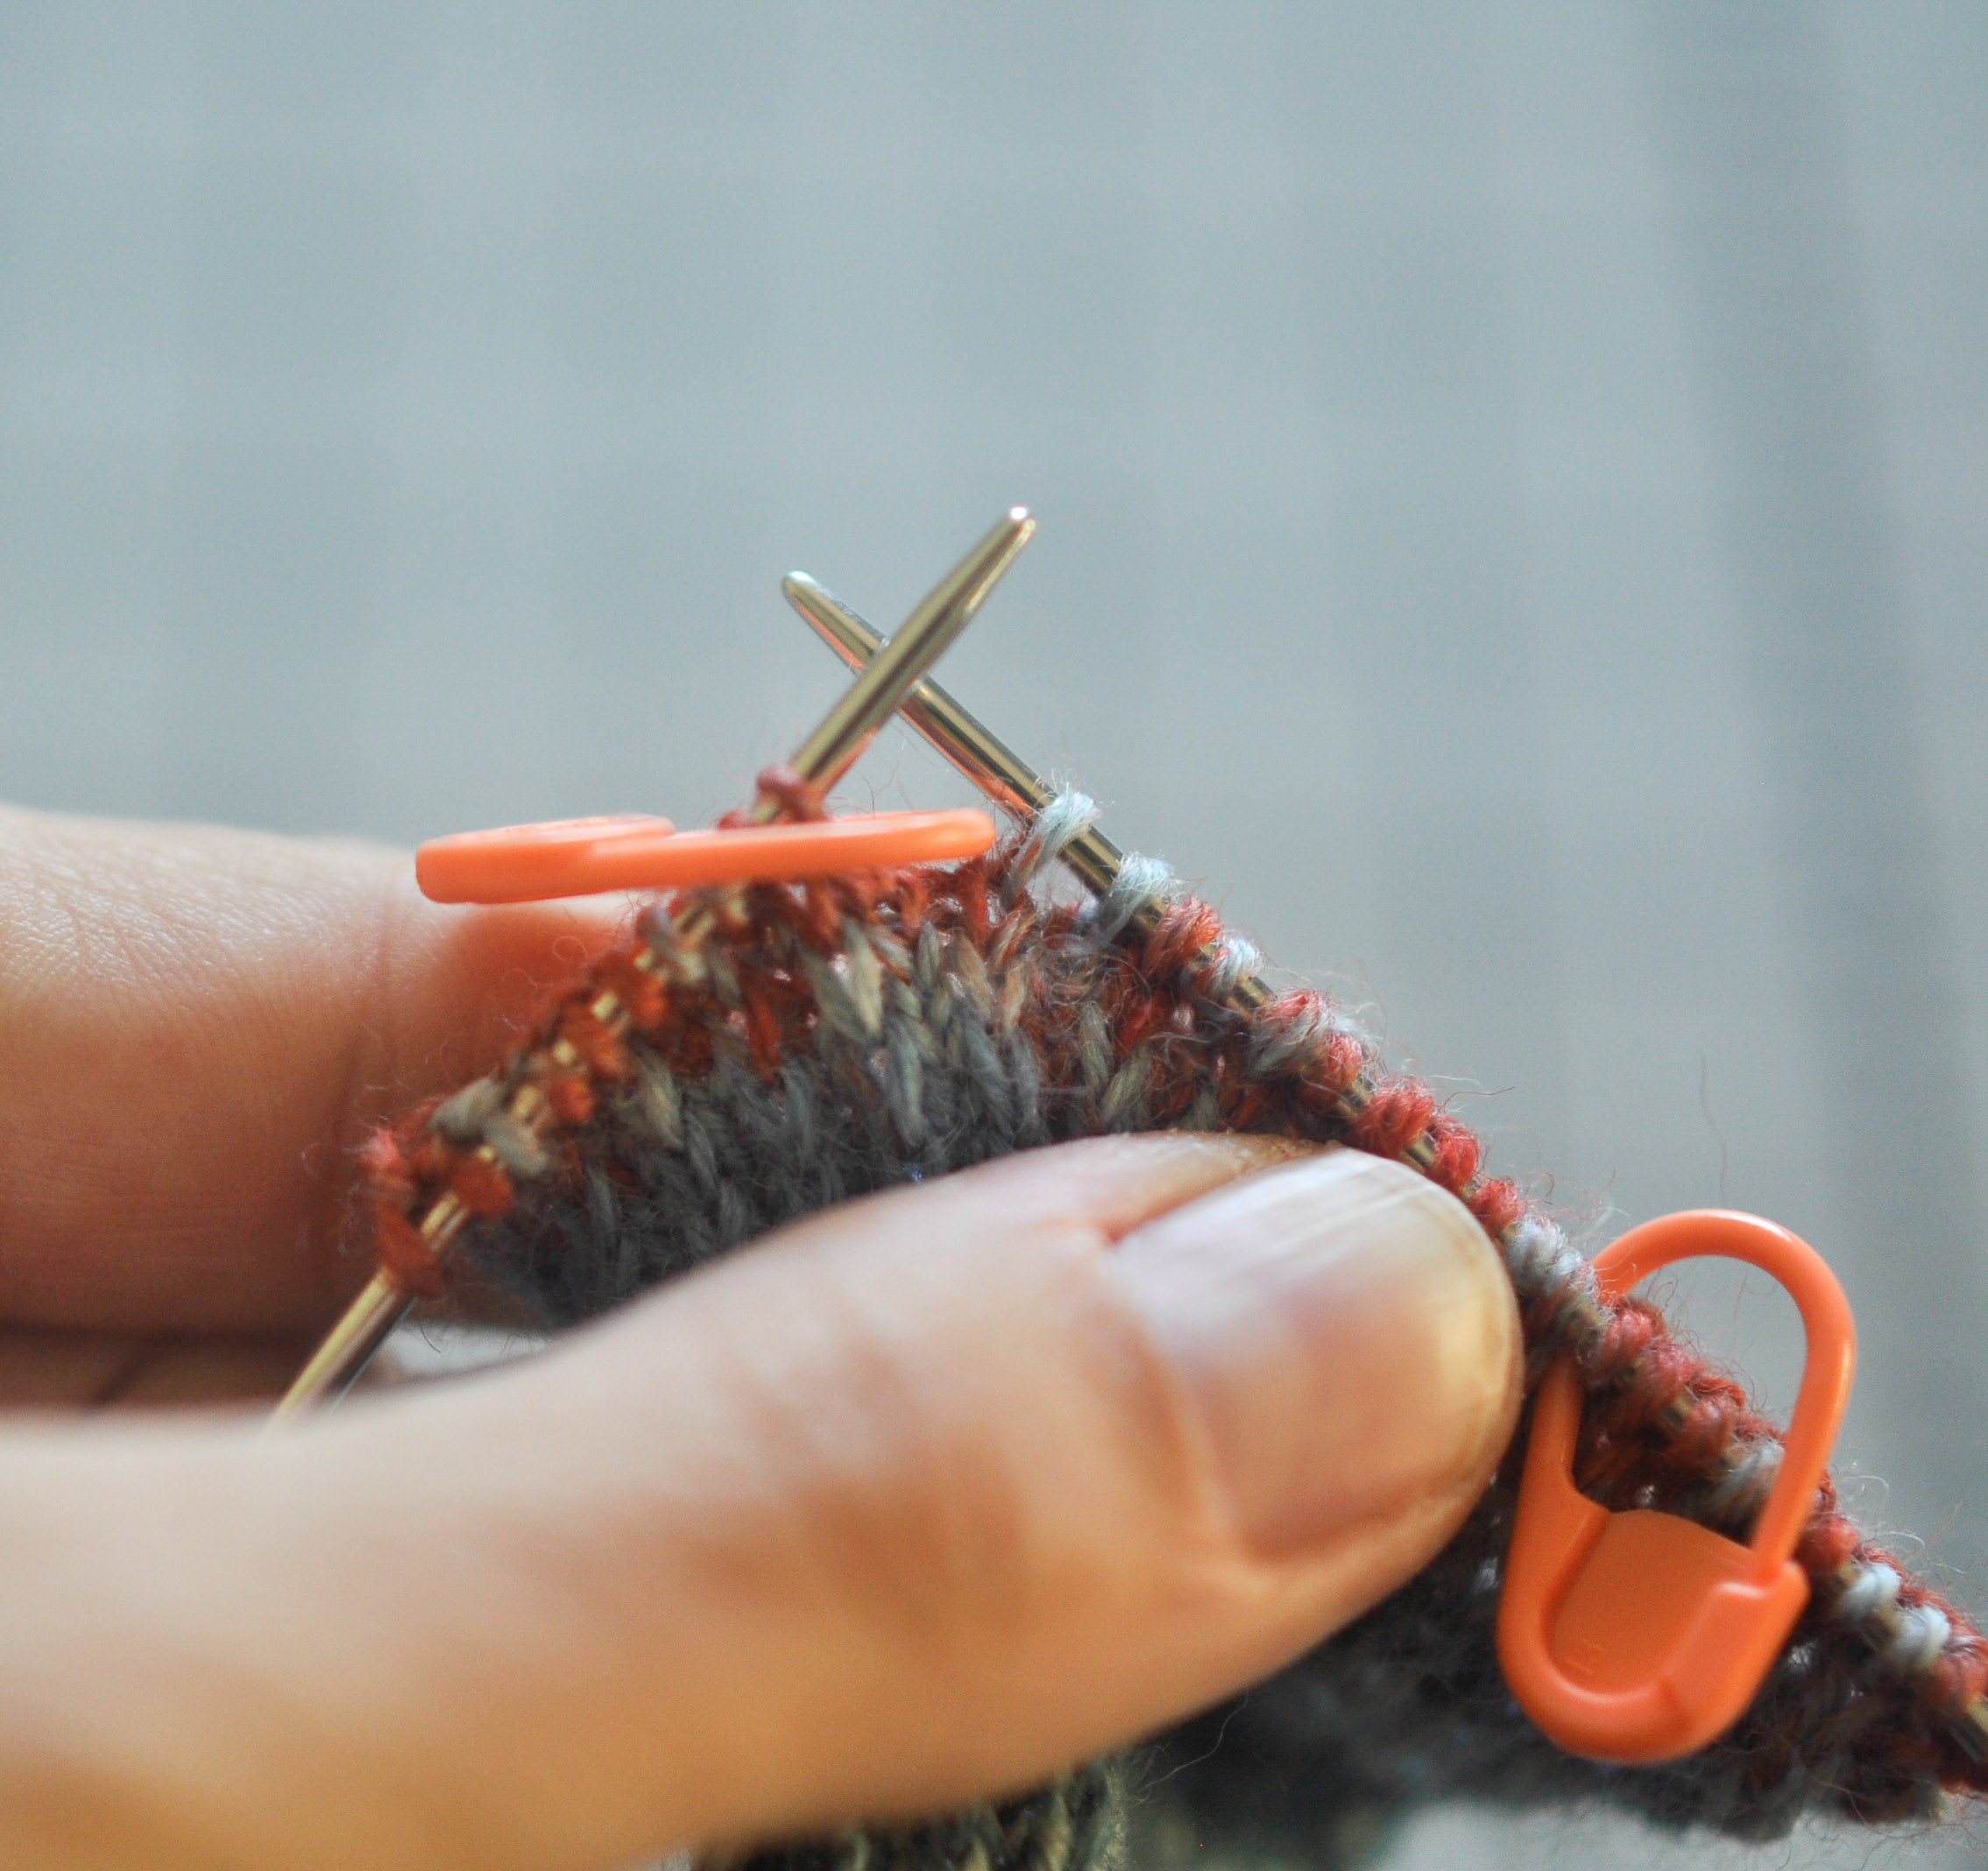 You are going to remove this marker and ssk, then k1. If those abbreviations are unfamiliar to you, go get some knowledge and come back. Then you turn your work. This is the beginning of a short row. I was so confused the first time I did this. Turn my work? I didn’t finish the whole row. What the heck? Flip it over, people. Check out the purl side.
 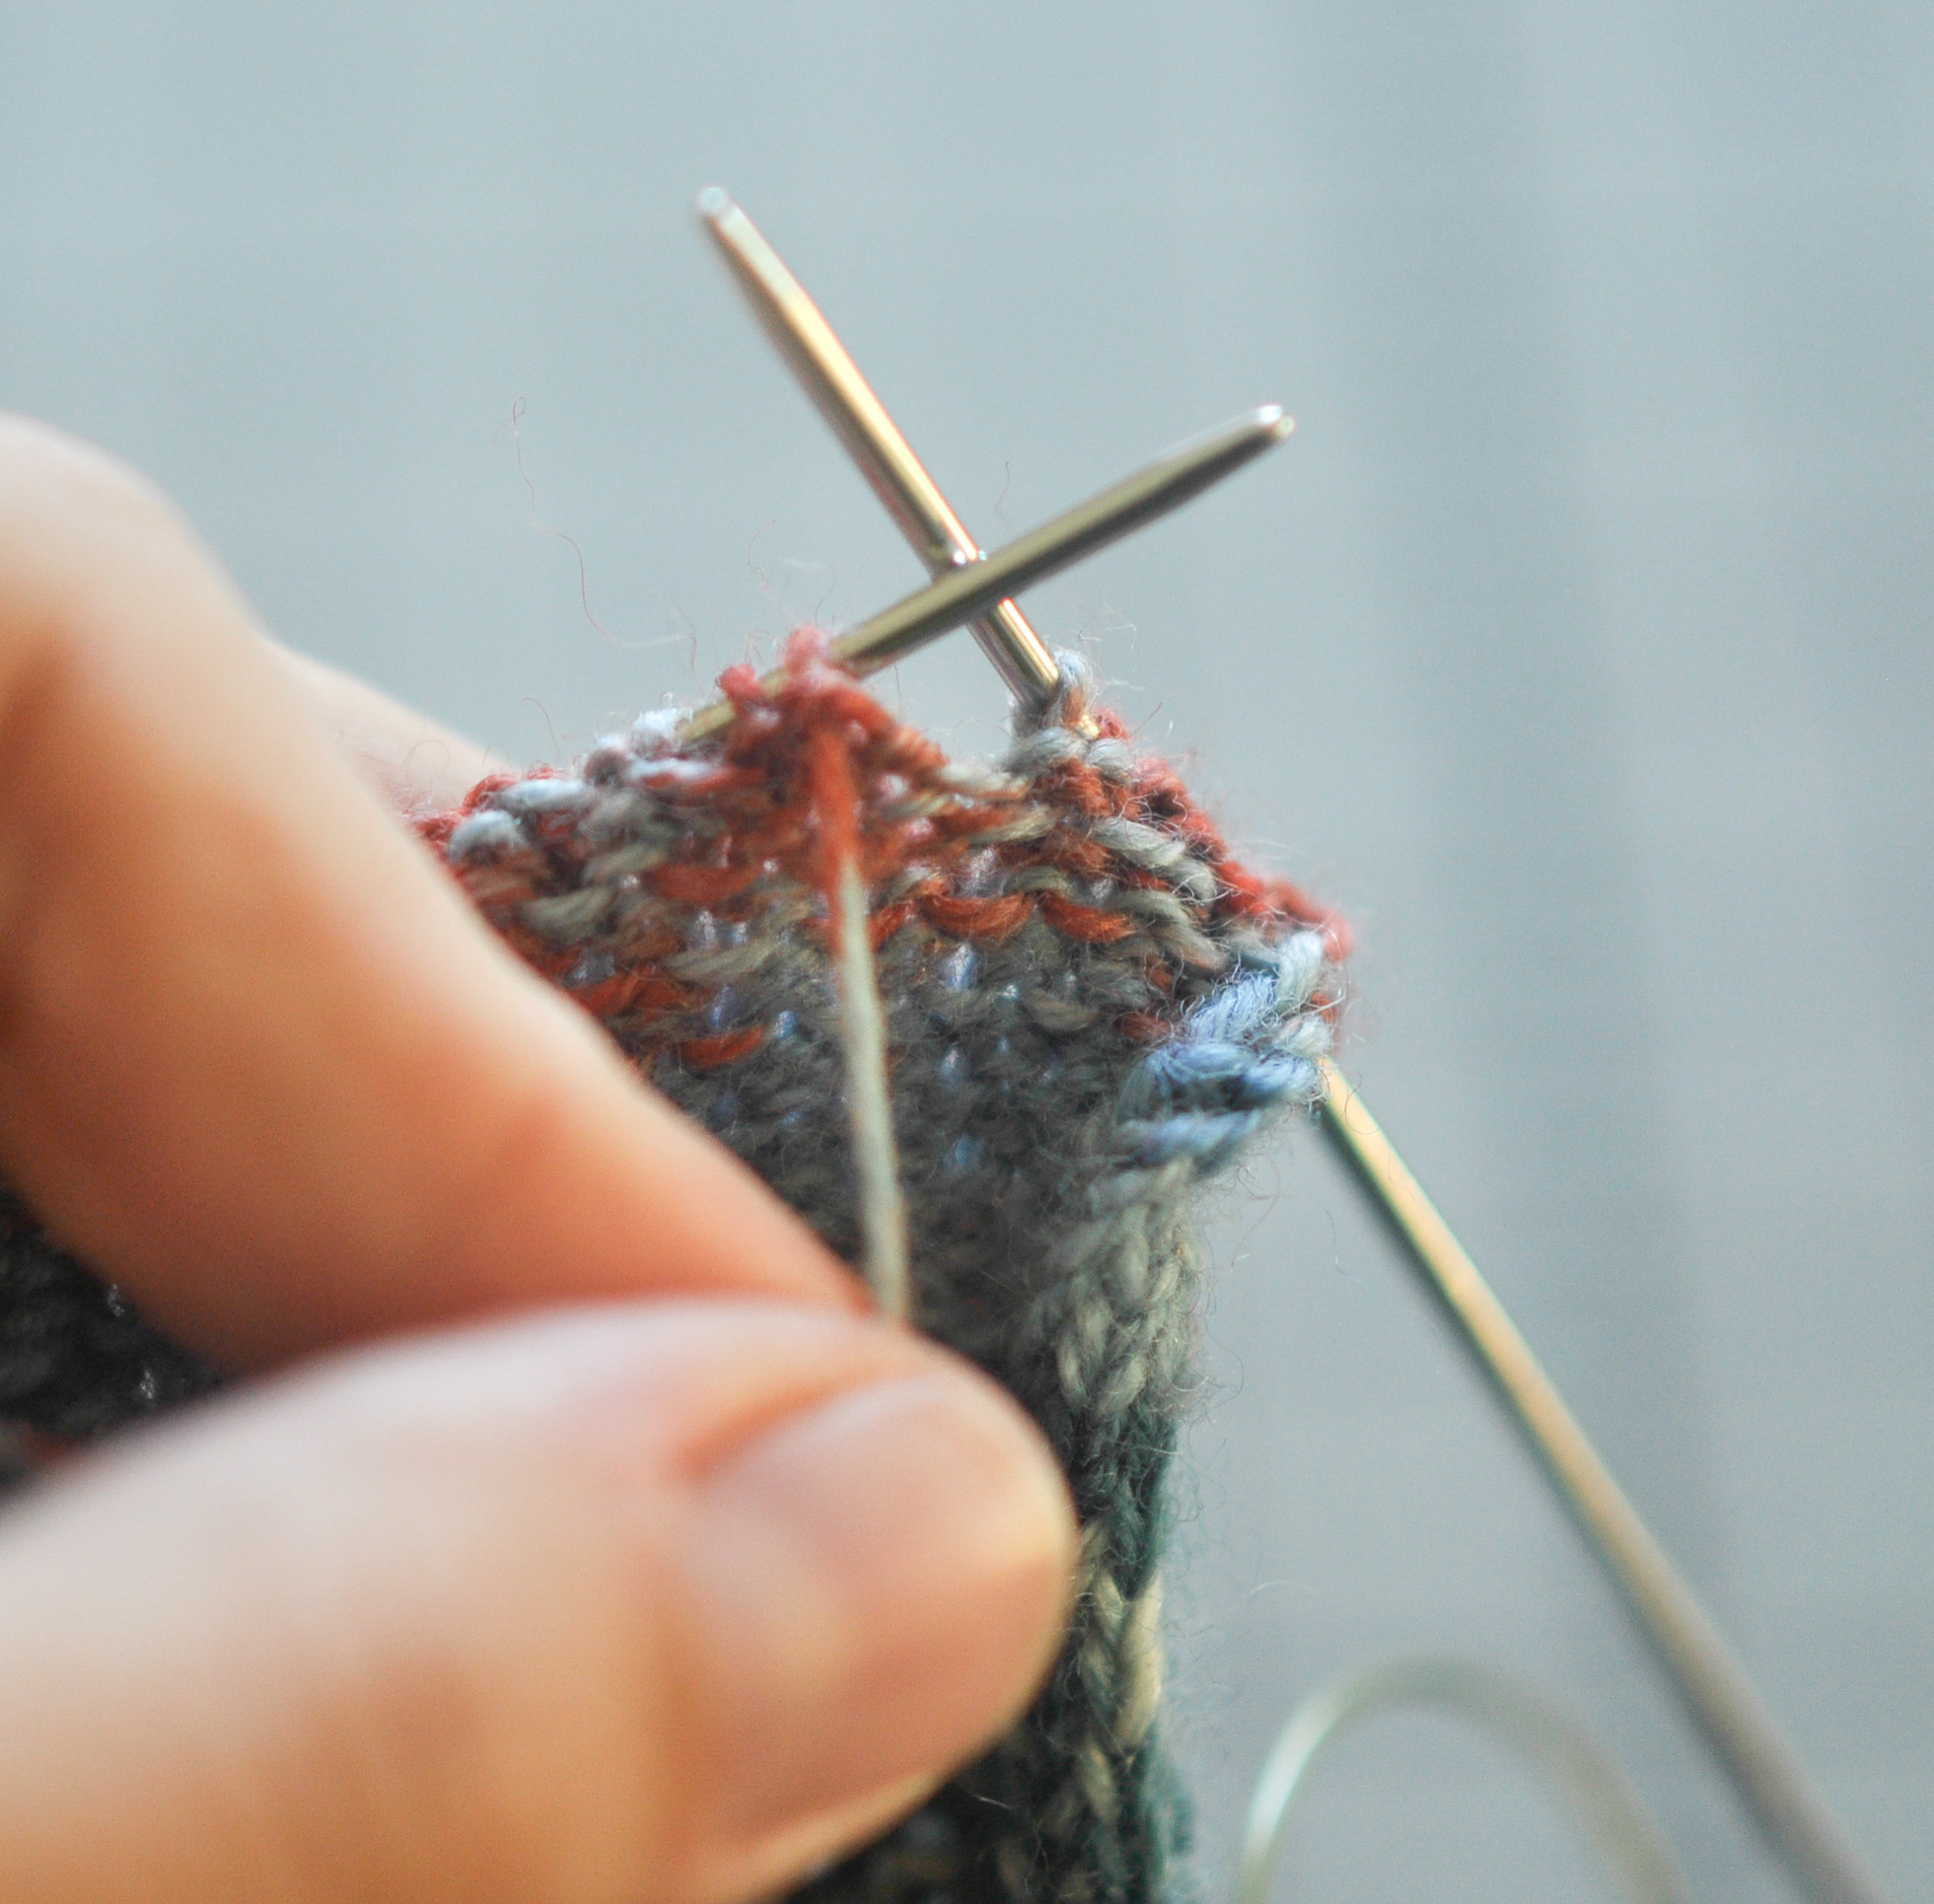 Congratulations. You just turned your work. Sometimes you might not expect the instructions to be that literal, but sometimes they are. Now you purl back to the other marker, slipping the first stitch on your way.
 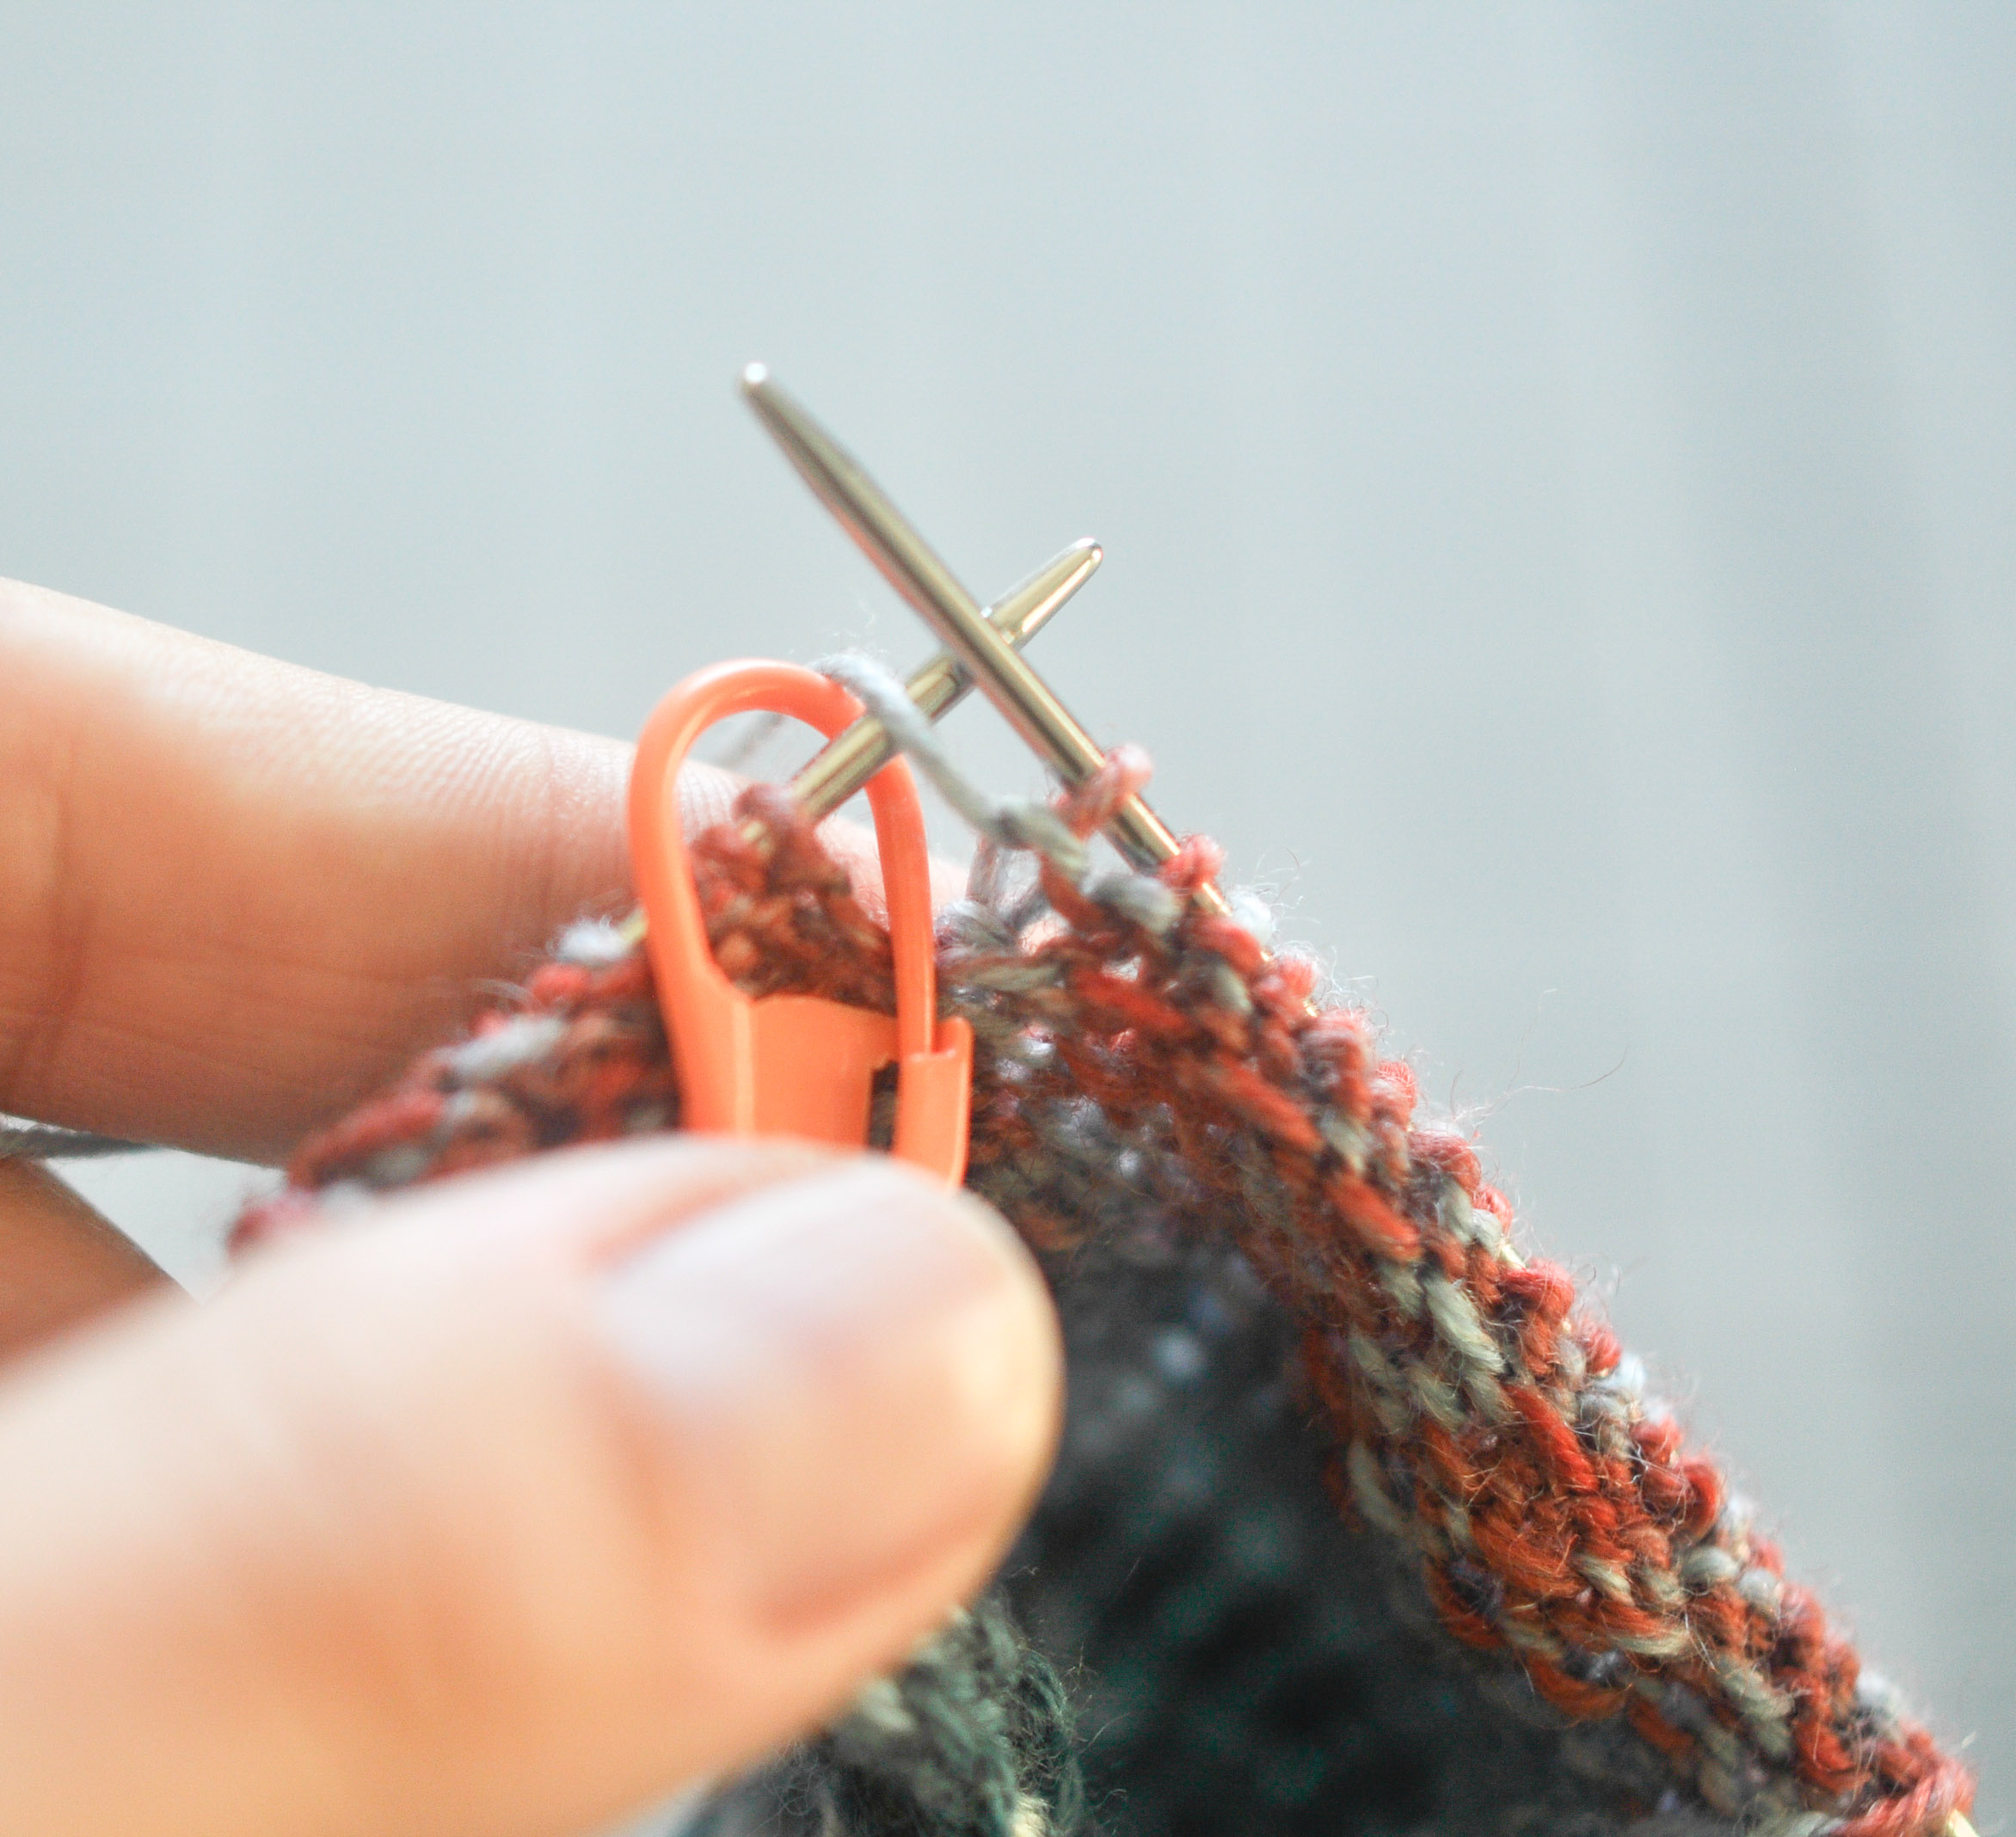 When at that marker, remove it, p2tog, then p1 and (maybe you guessed already) turn your work again. Work in pattern until you get to what looks like a big gap where you turned last time.
 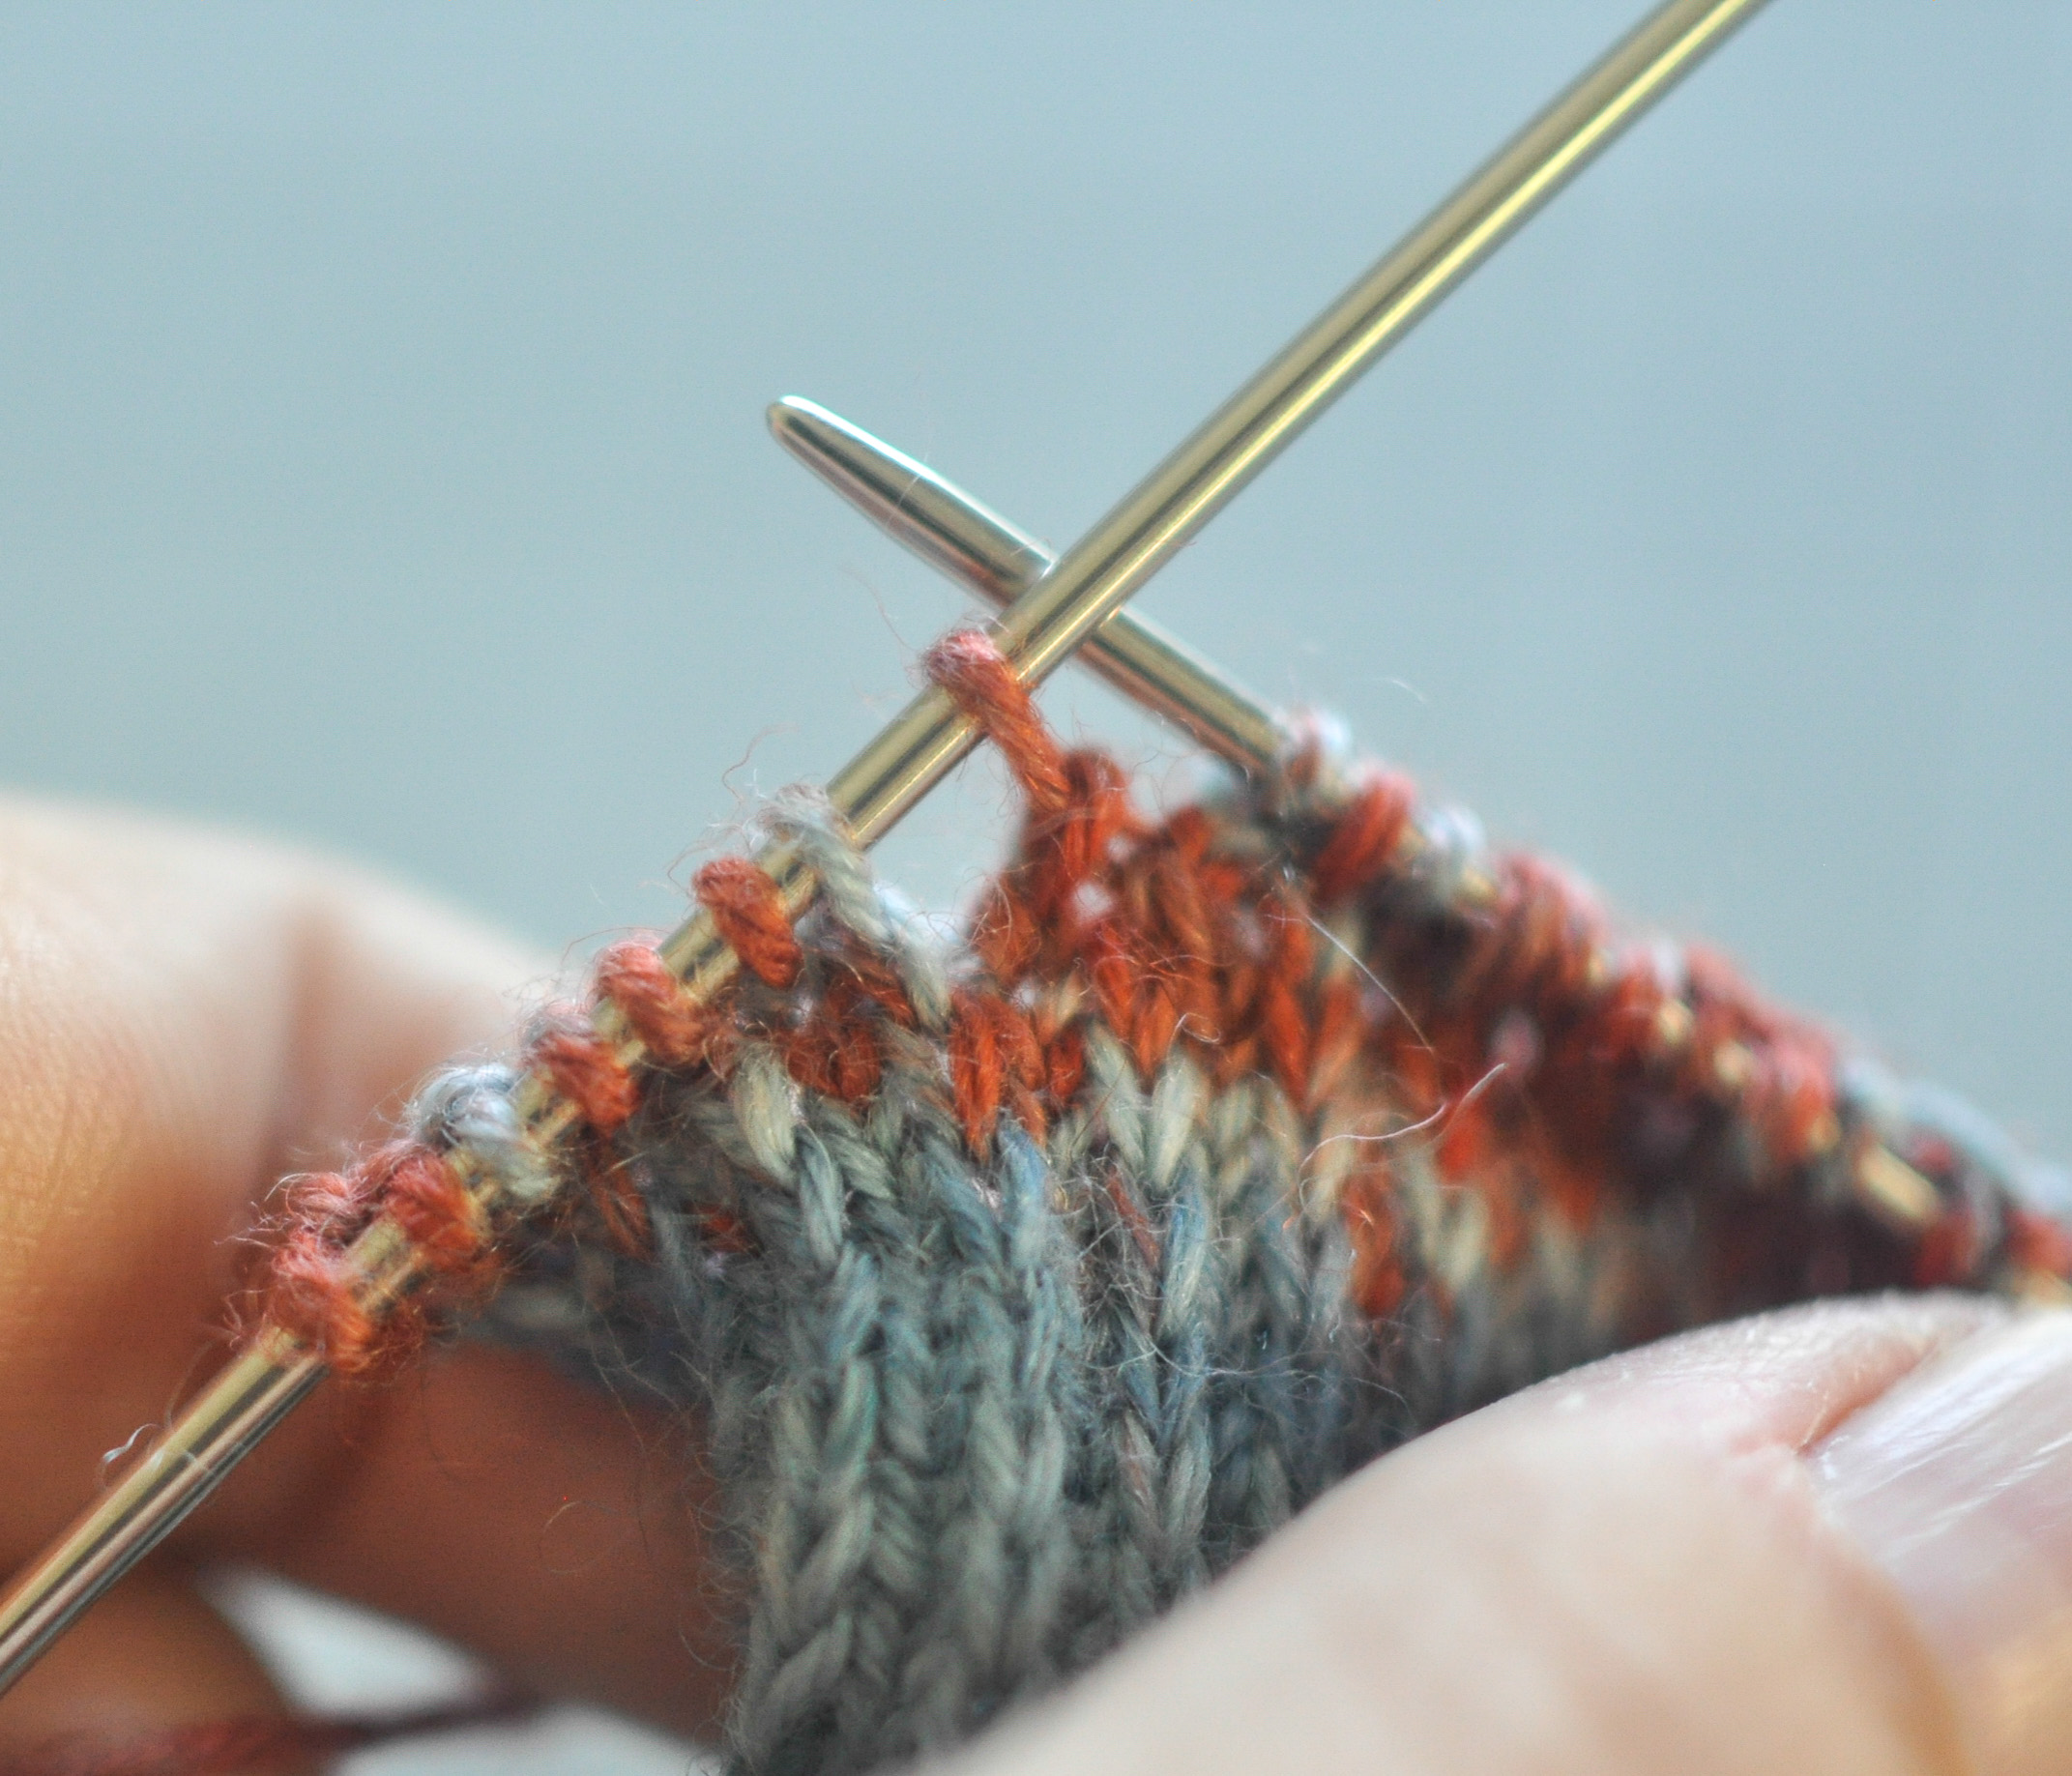 You close that gap by doing your ssk across the gap. Then k1, and turn again. Slip that first purled stitch and purl across until you come to another gap on the purl side.
 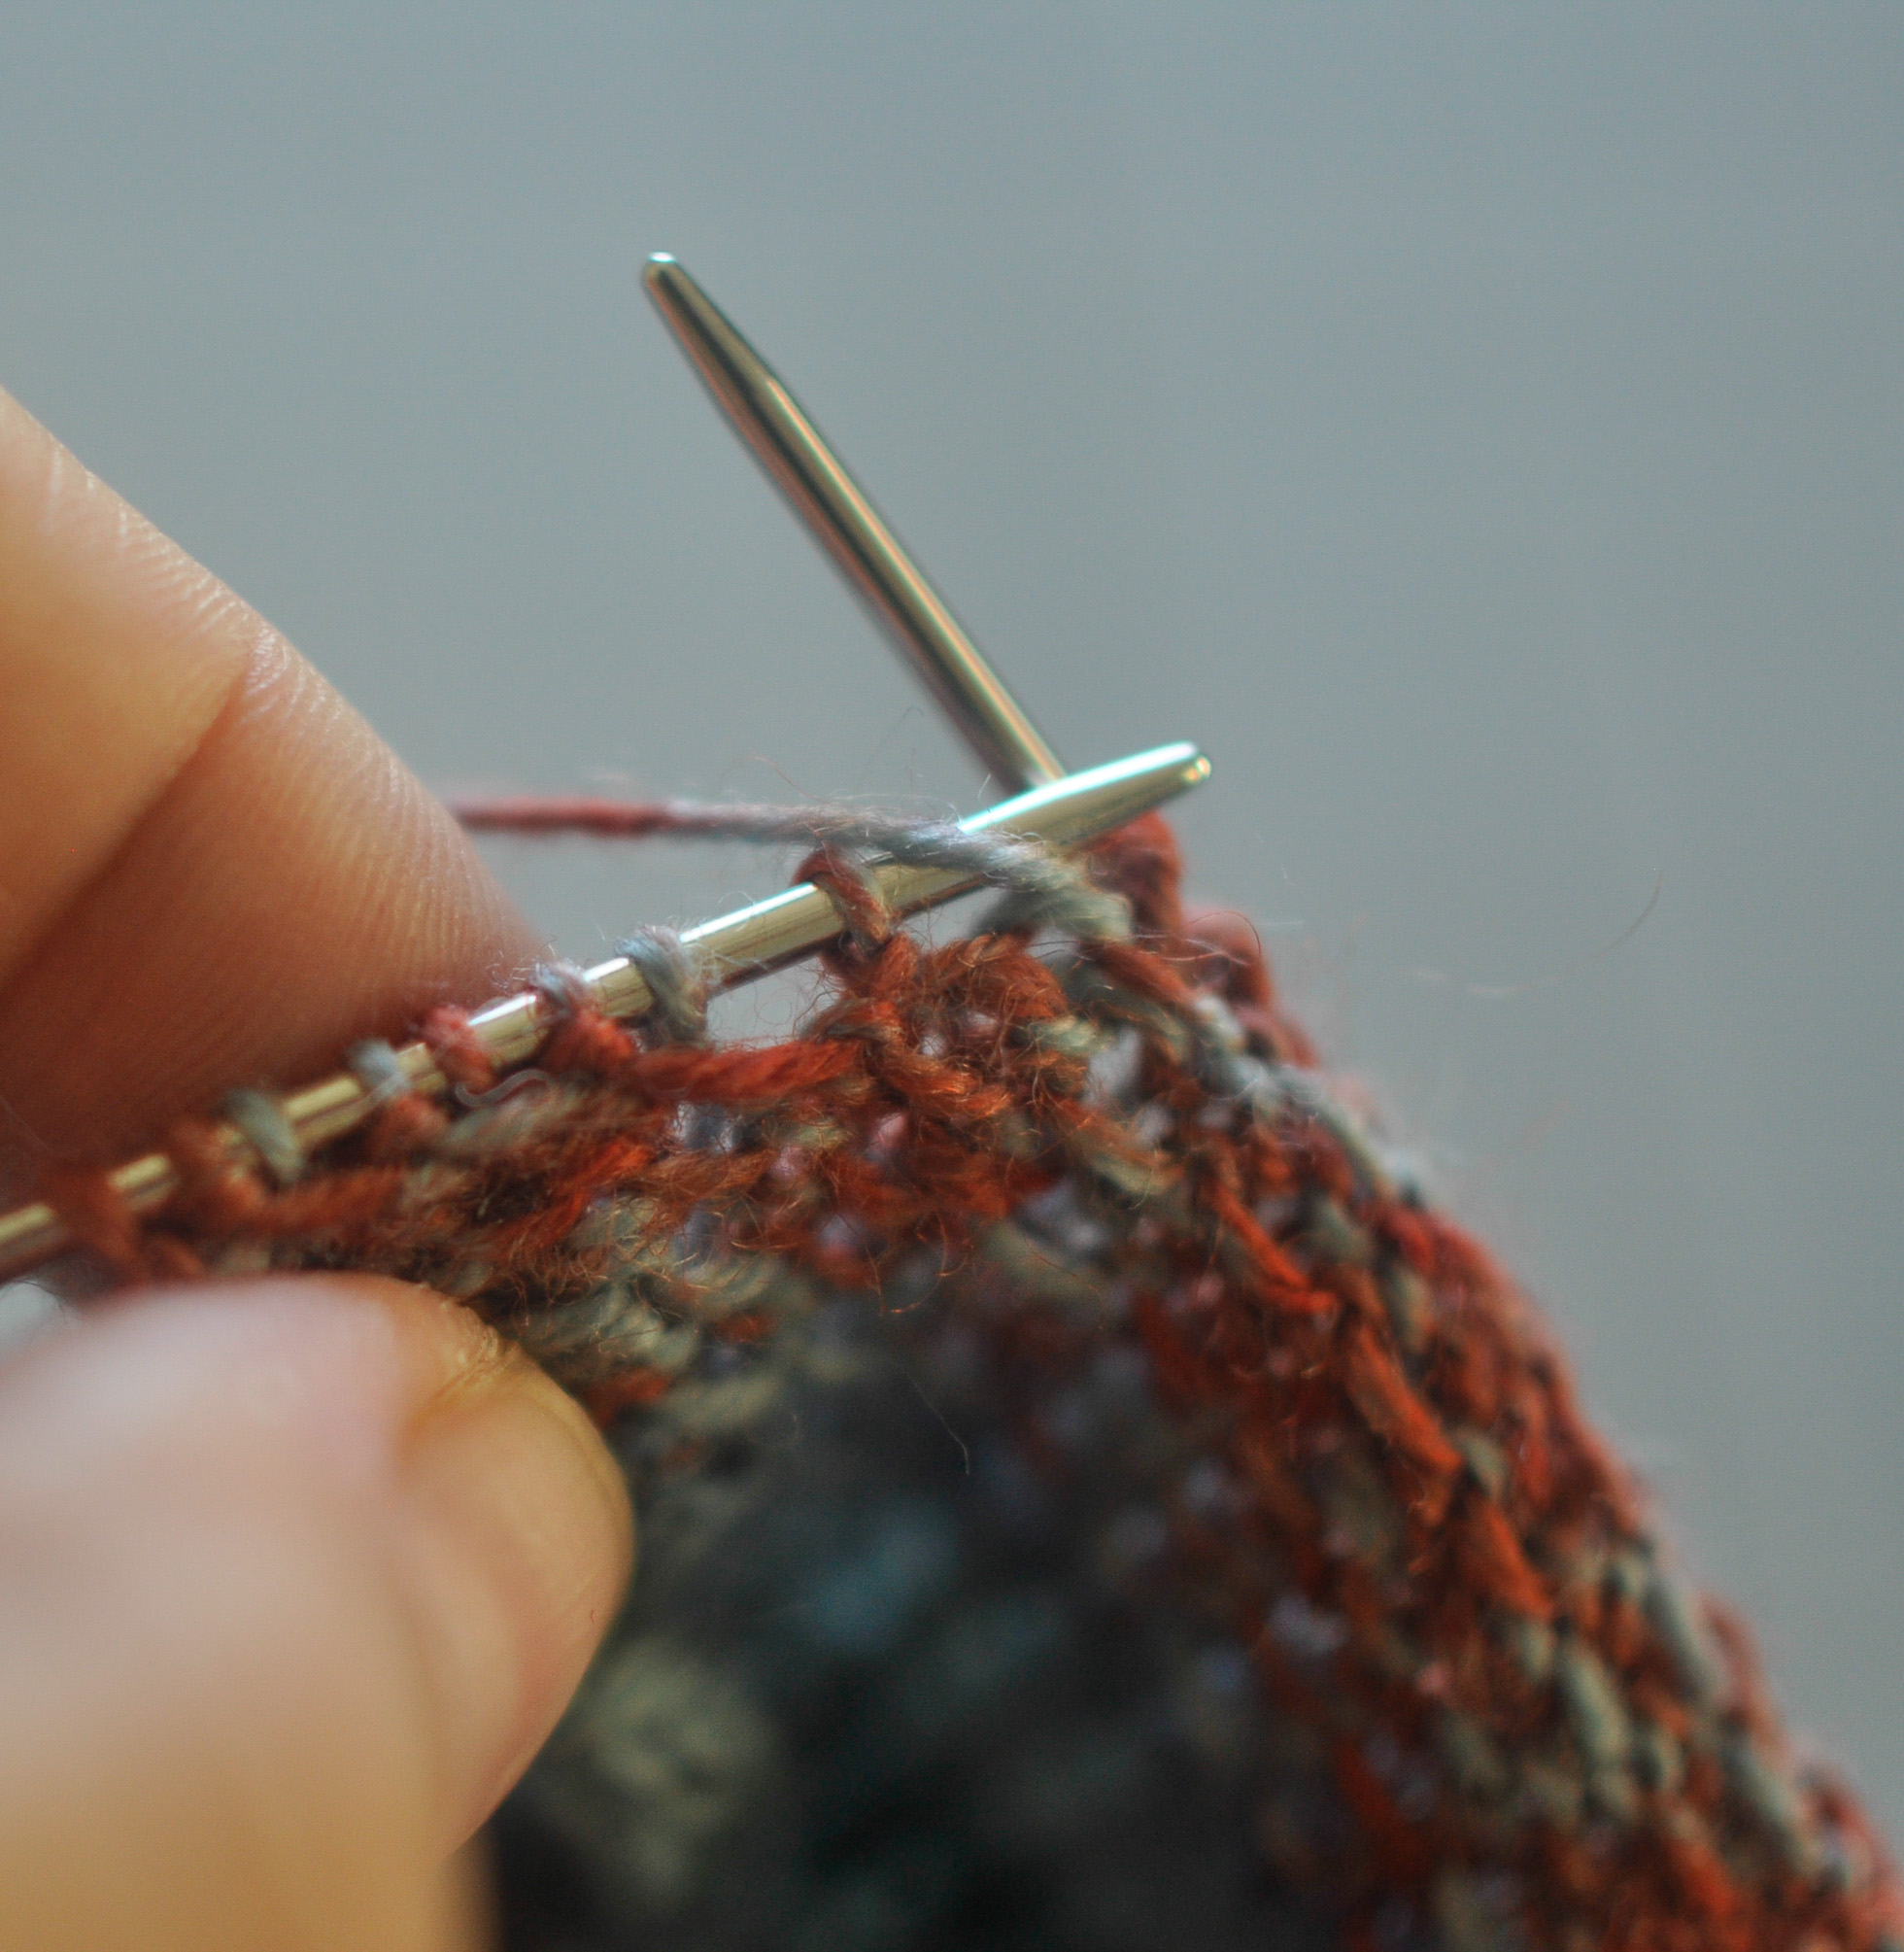 This time you p2tog across the gap, then p1, and (now you know it for sure), turn again. These are short rows. They’re not rocket science, and different versions deal with ways to avoid a gap. They are a very cool and useful tool to be sure. You can repeat these rows until you come to the very edge of the flaps working in this way. Sometimes you might end with an ssk rather than a k1 on the RS. It all depends on how many stitches are on your flap. It doesn’t affect the next step. After your final WS row, go ahead and work one more RS row in pattern.
 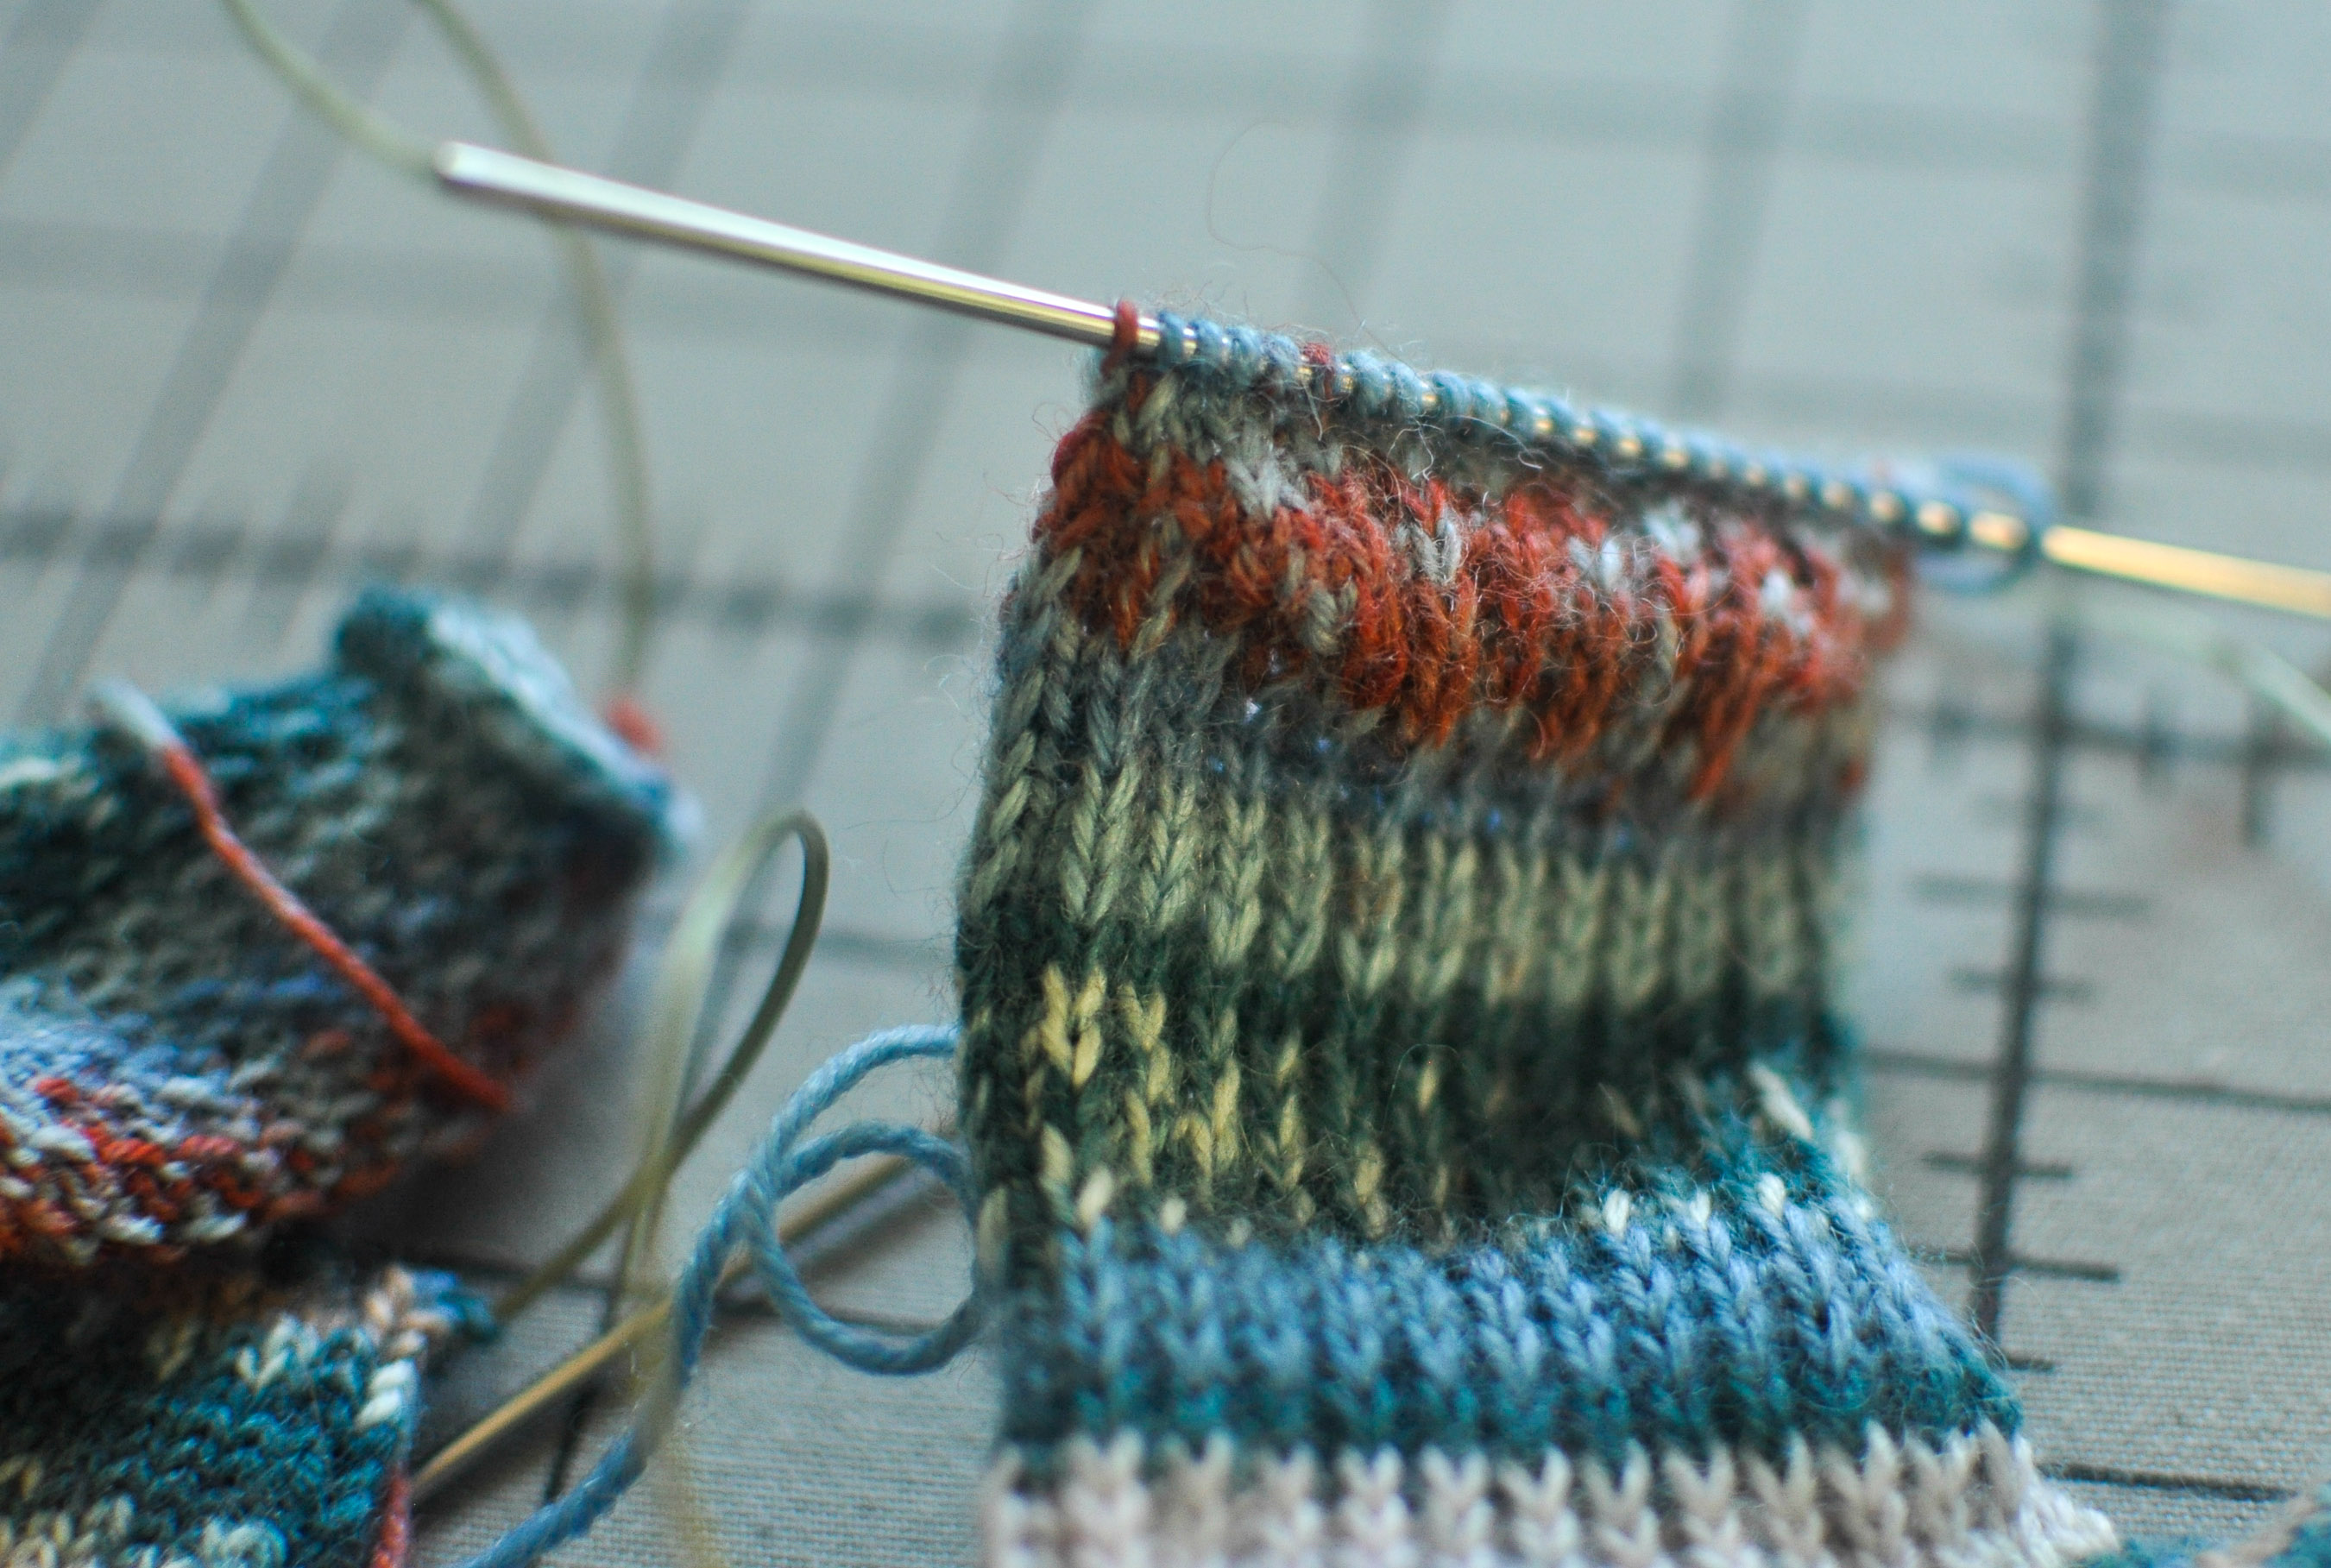 Stop and admire the beautiful little curved heel flap you just made. Now, you need to pick up your left (as worn) gusset stitches. What the heck is a gusset stitch? Well, when you were making your heel flap and slipped the first stitch on every row, that formed some beautiful pick up spots.
 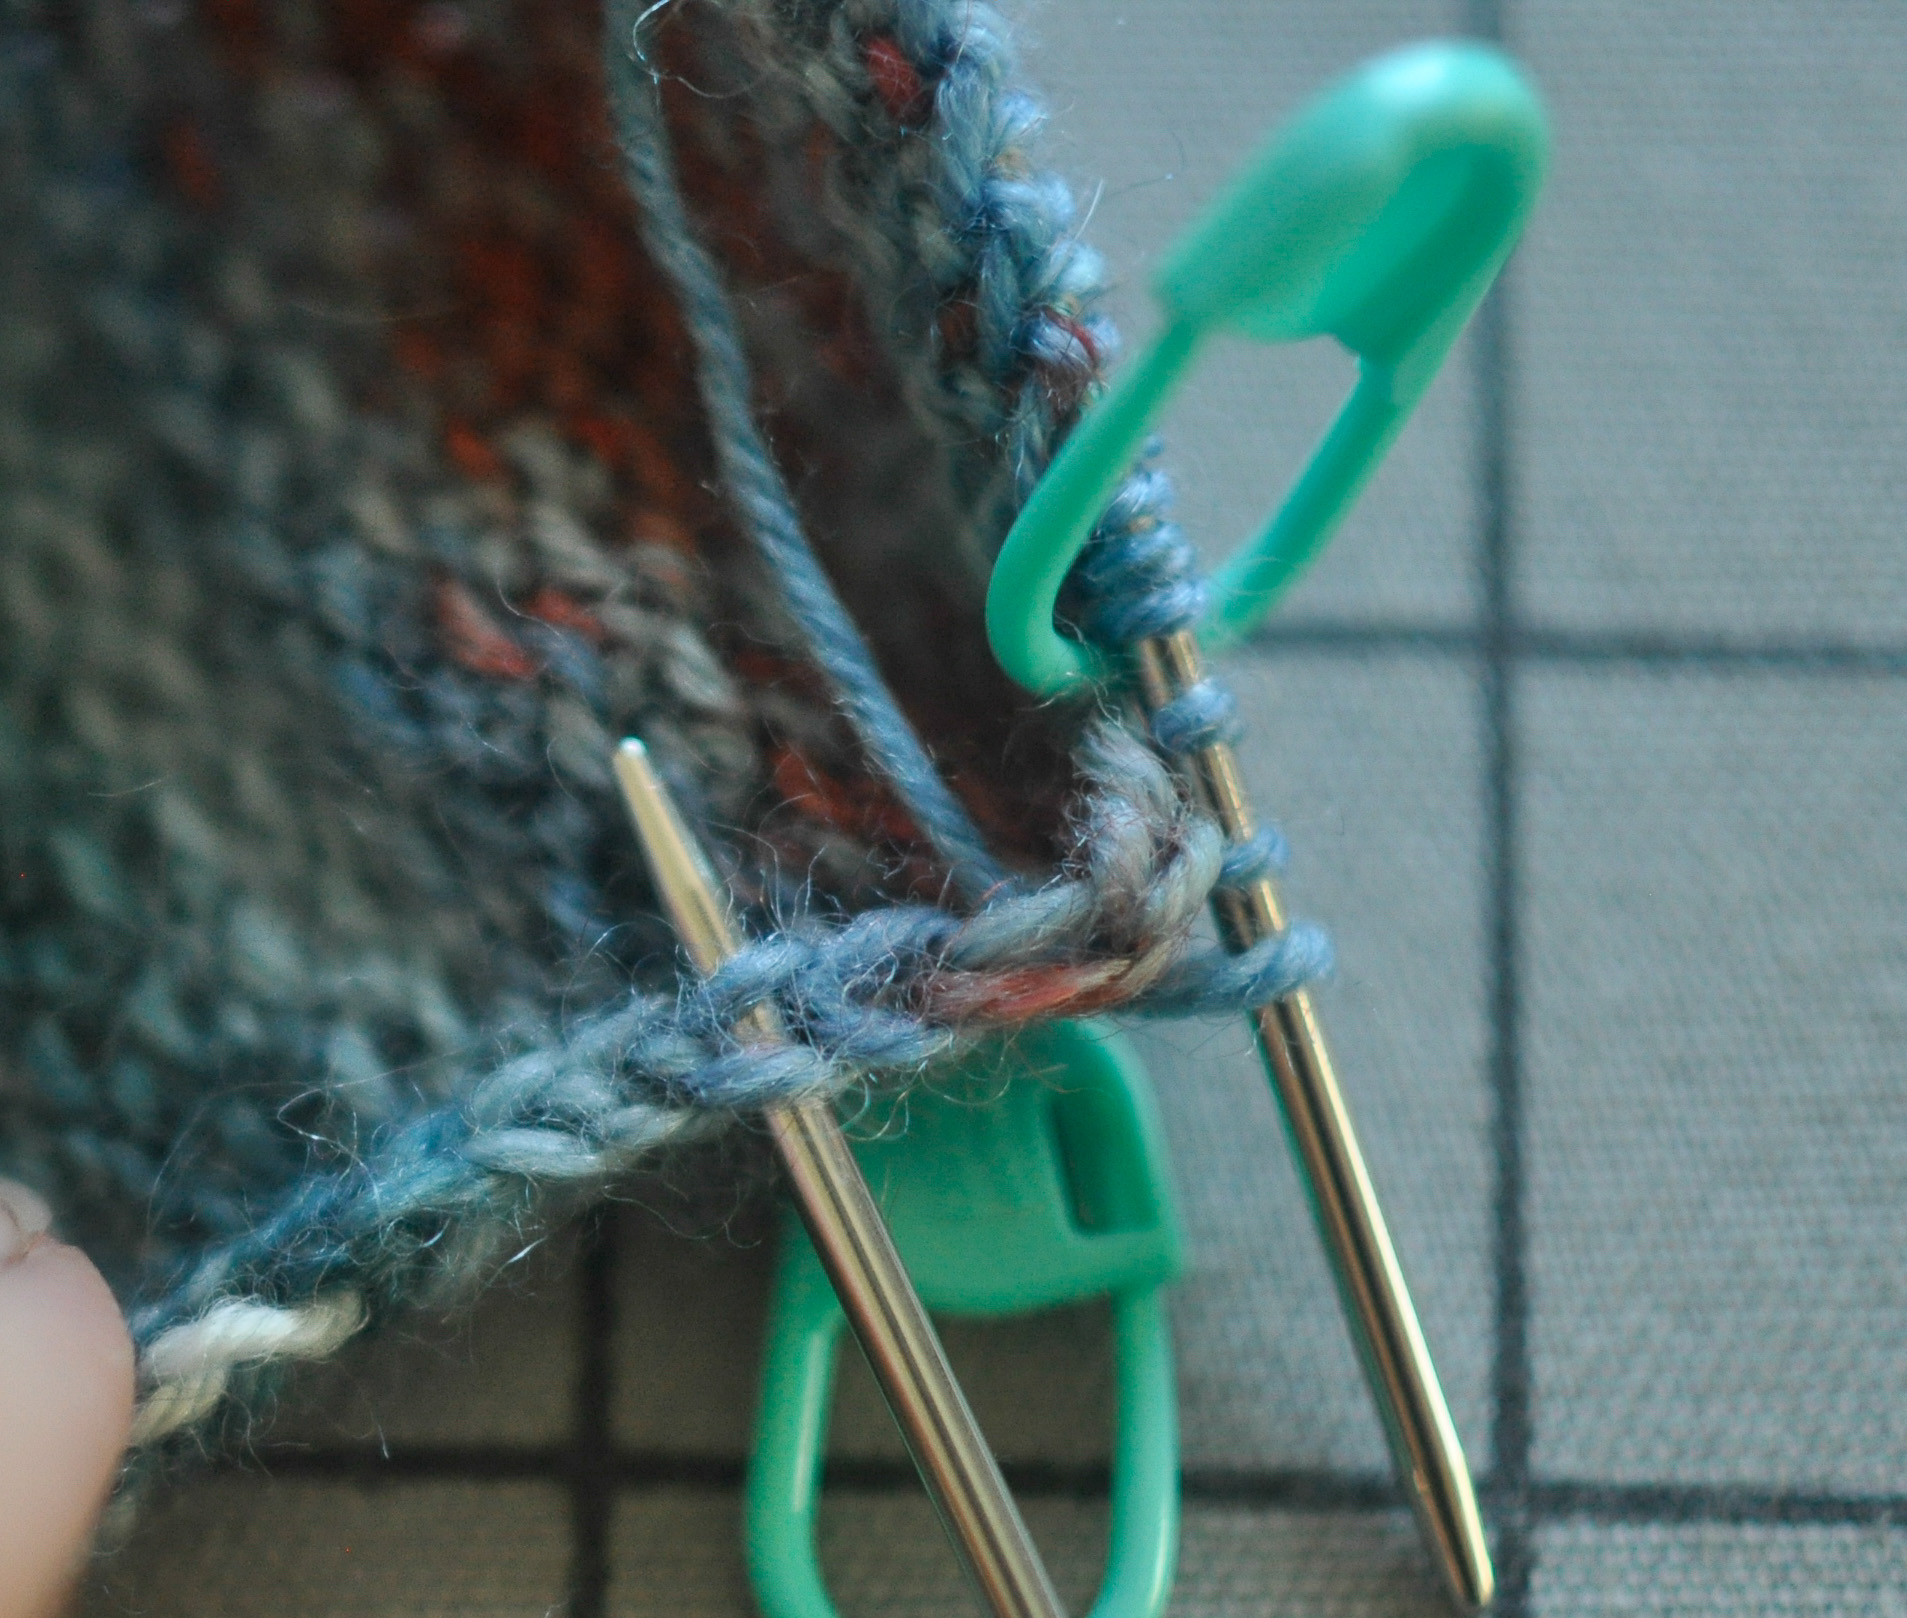 In the picture shown above I’ve placed the marker at the left edge of the heel flap and you can see 3 stitches picked up already. The other needle is poking into the example of a slipped stitch. I pick up under both strands of the slipped stitch and knit into that. It’s lovely. Try it. Keep track of the number of gusset stitches you have to make sure you match that on all sides.
 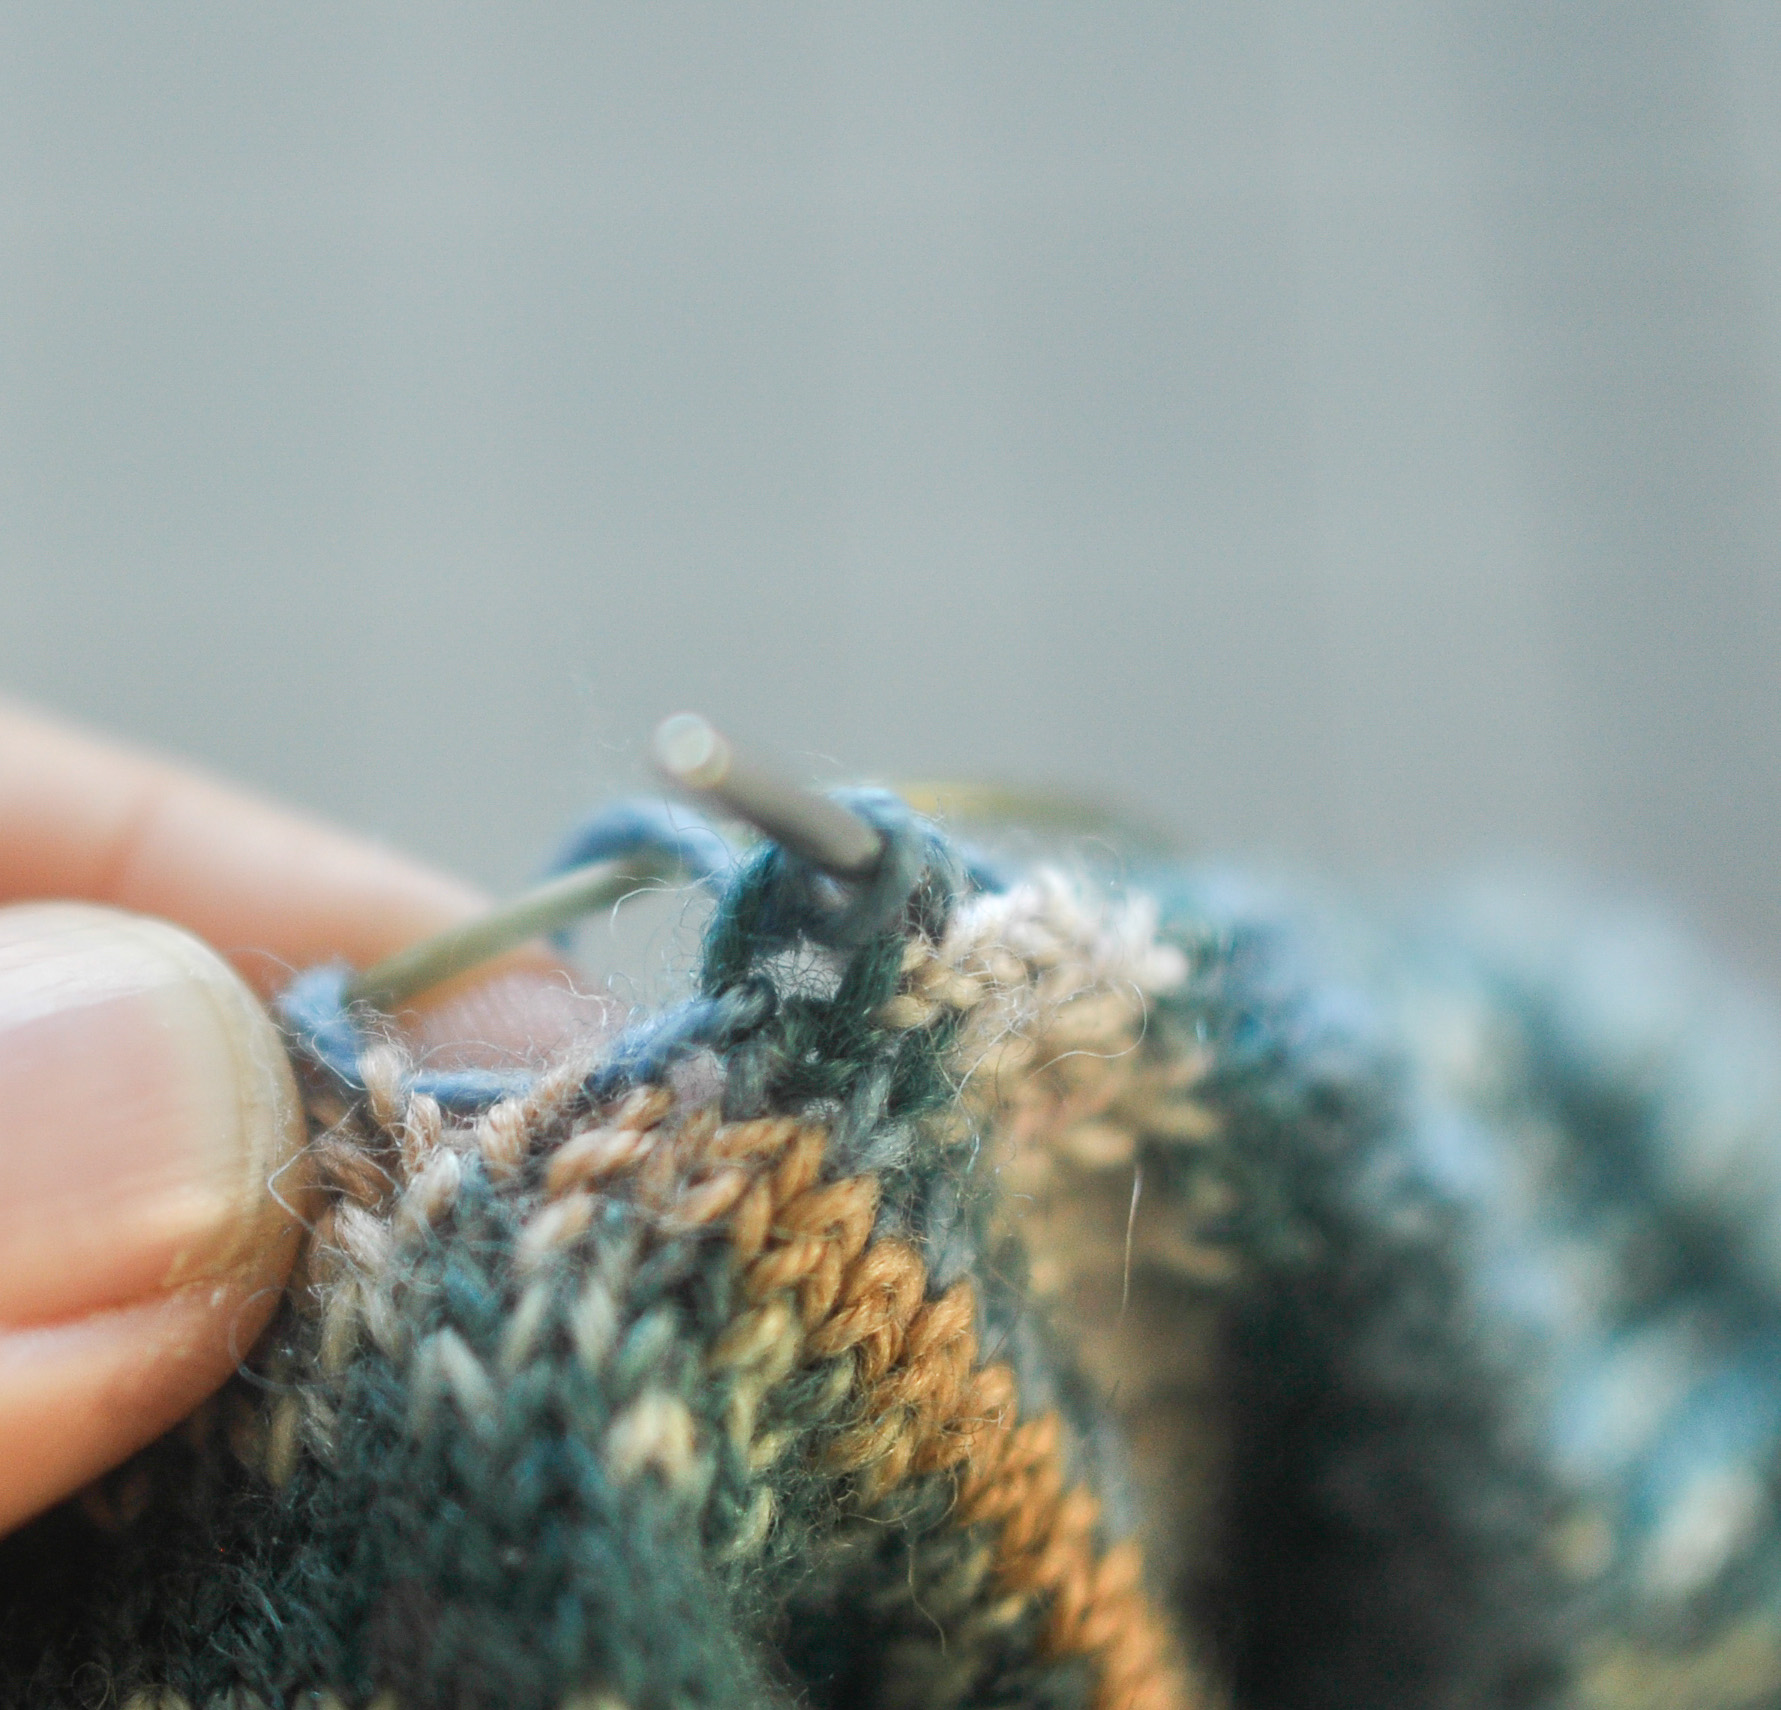 When you get to the last slipped stitch (the number depends on how long you made your heel flap), you might notice a bit of a gap between your heel flap and instep.
 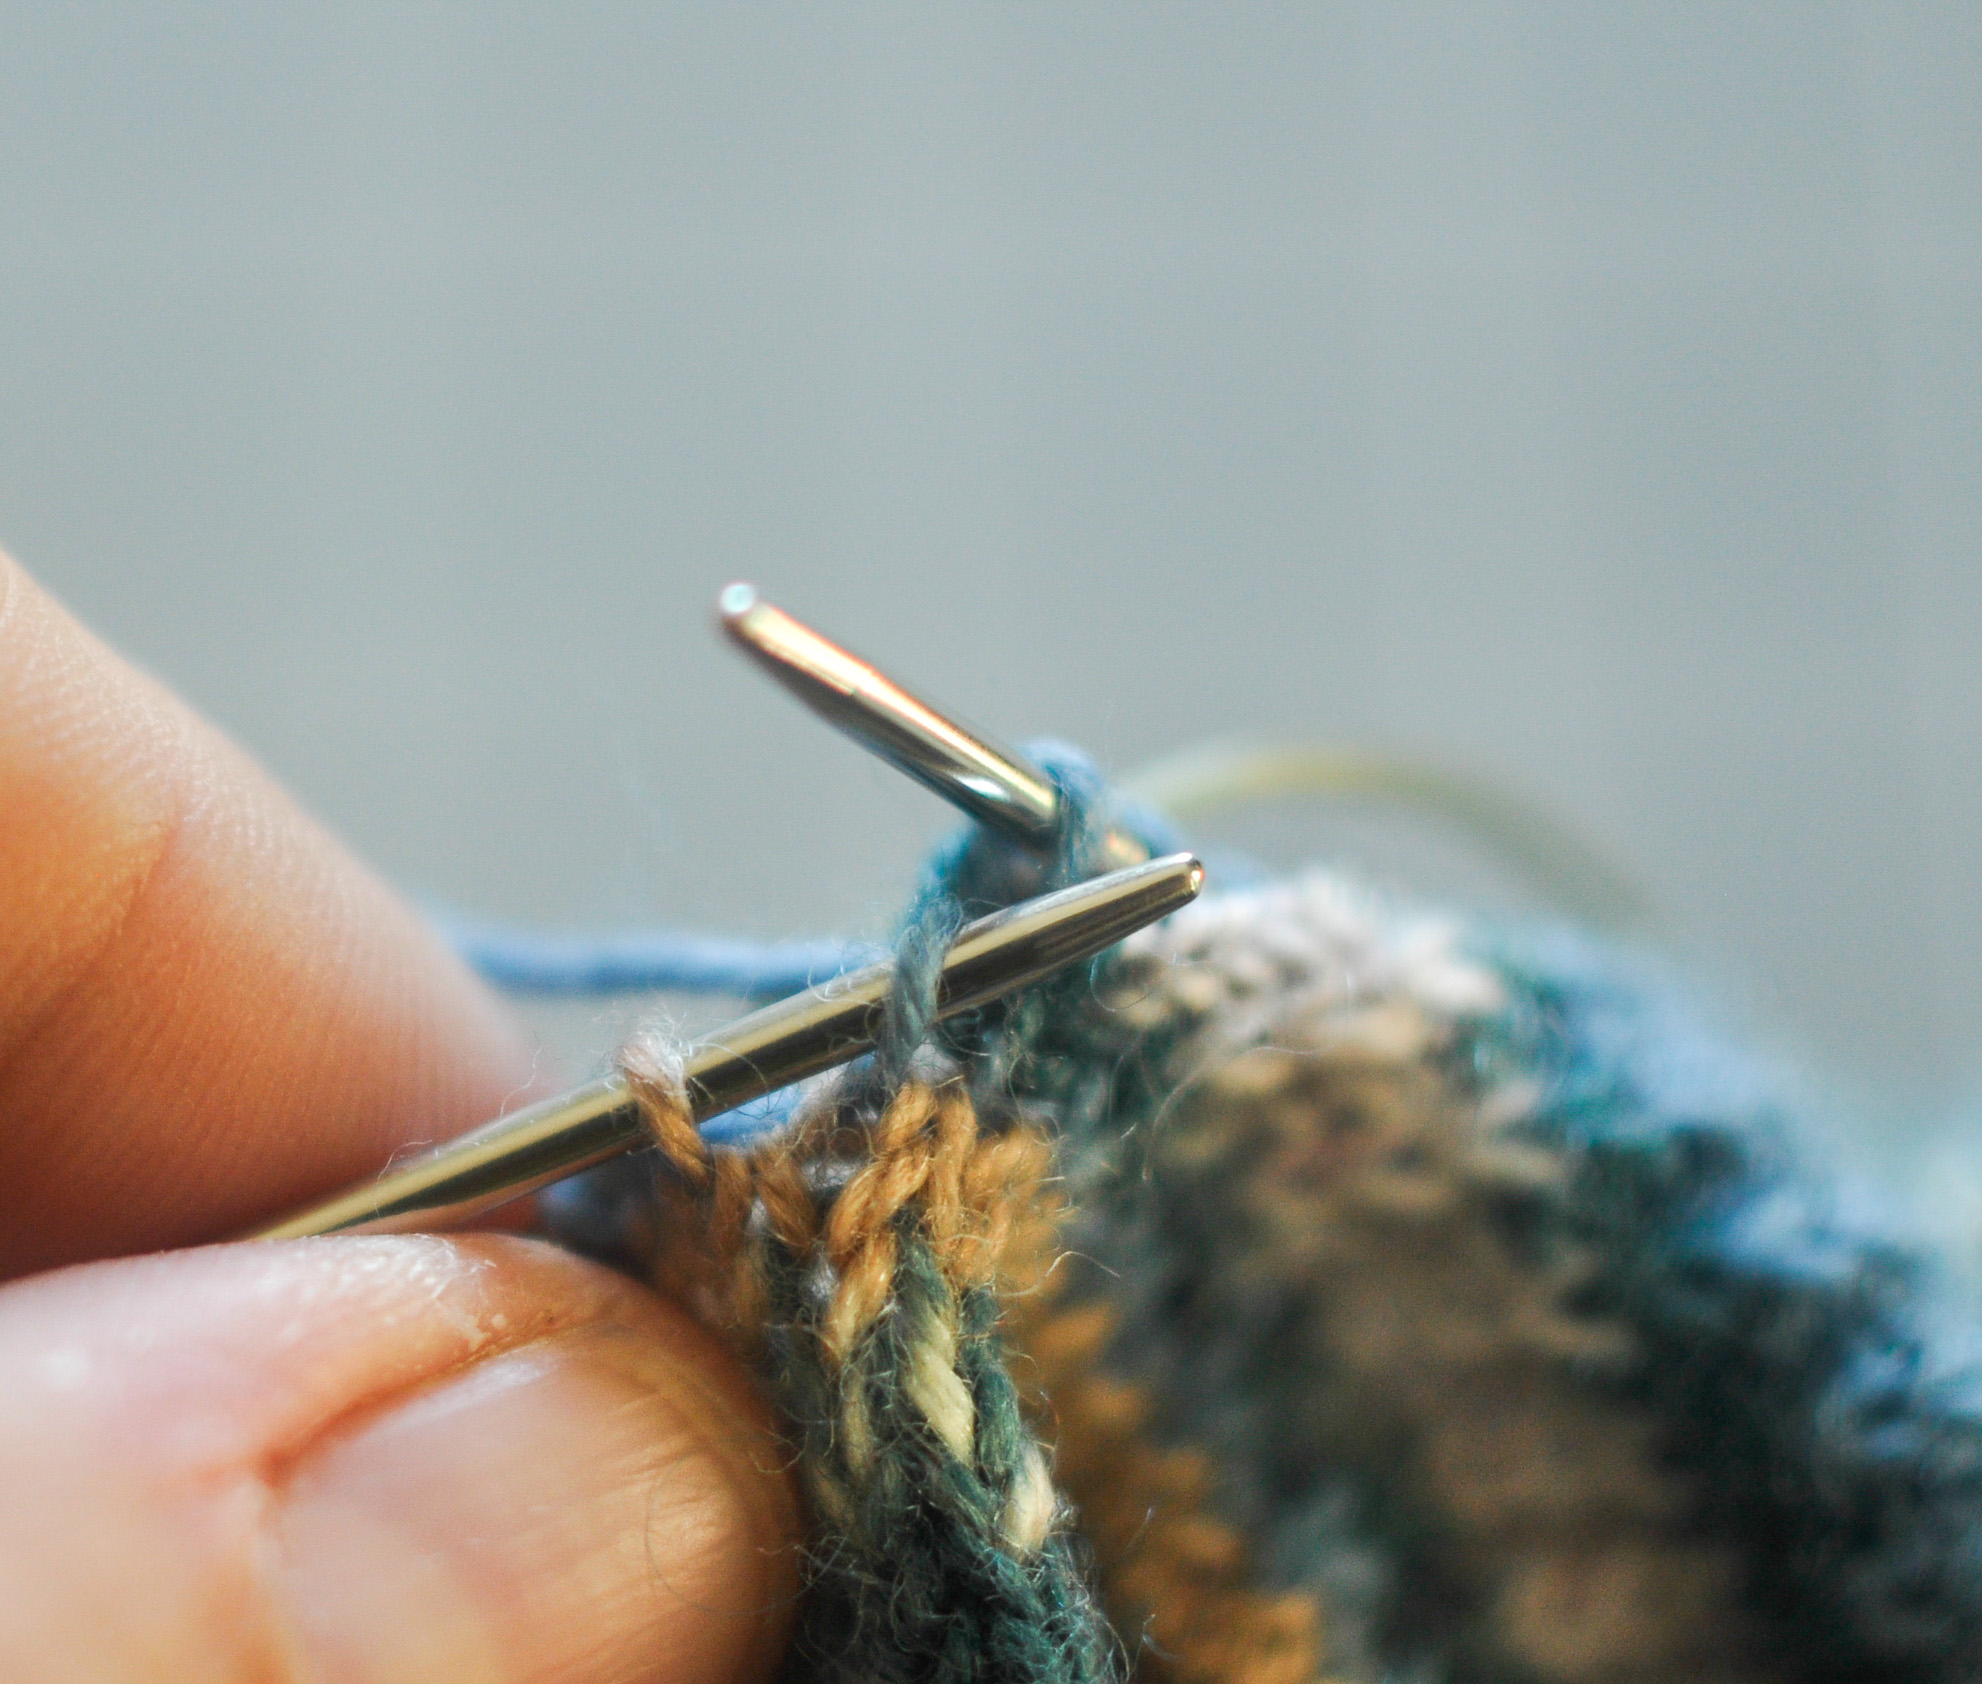 Pick up the right legs of a couple of stitches below and knit them together, working through the back loop.
 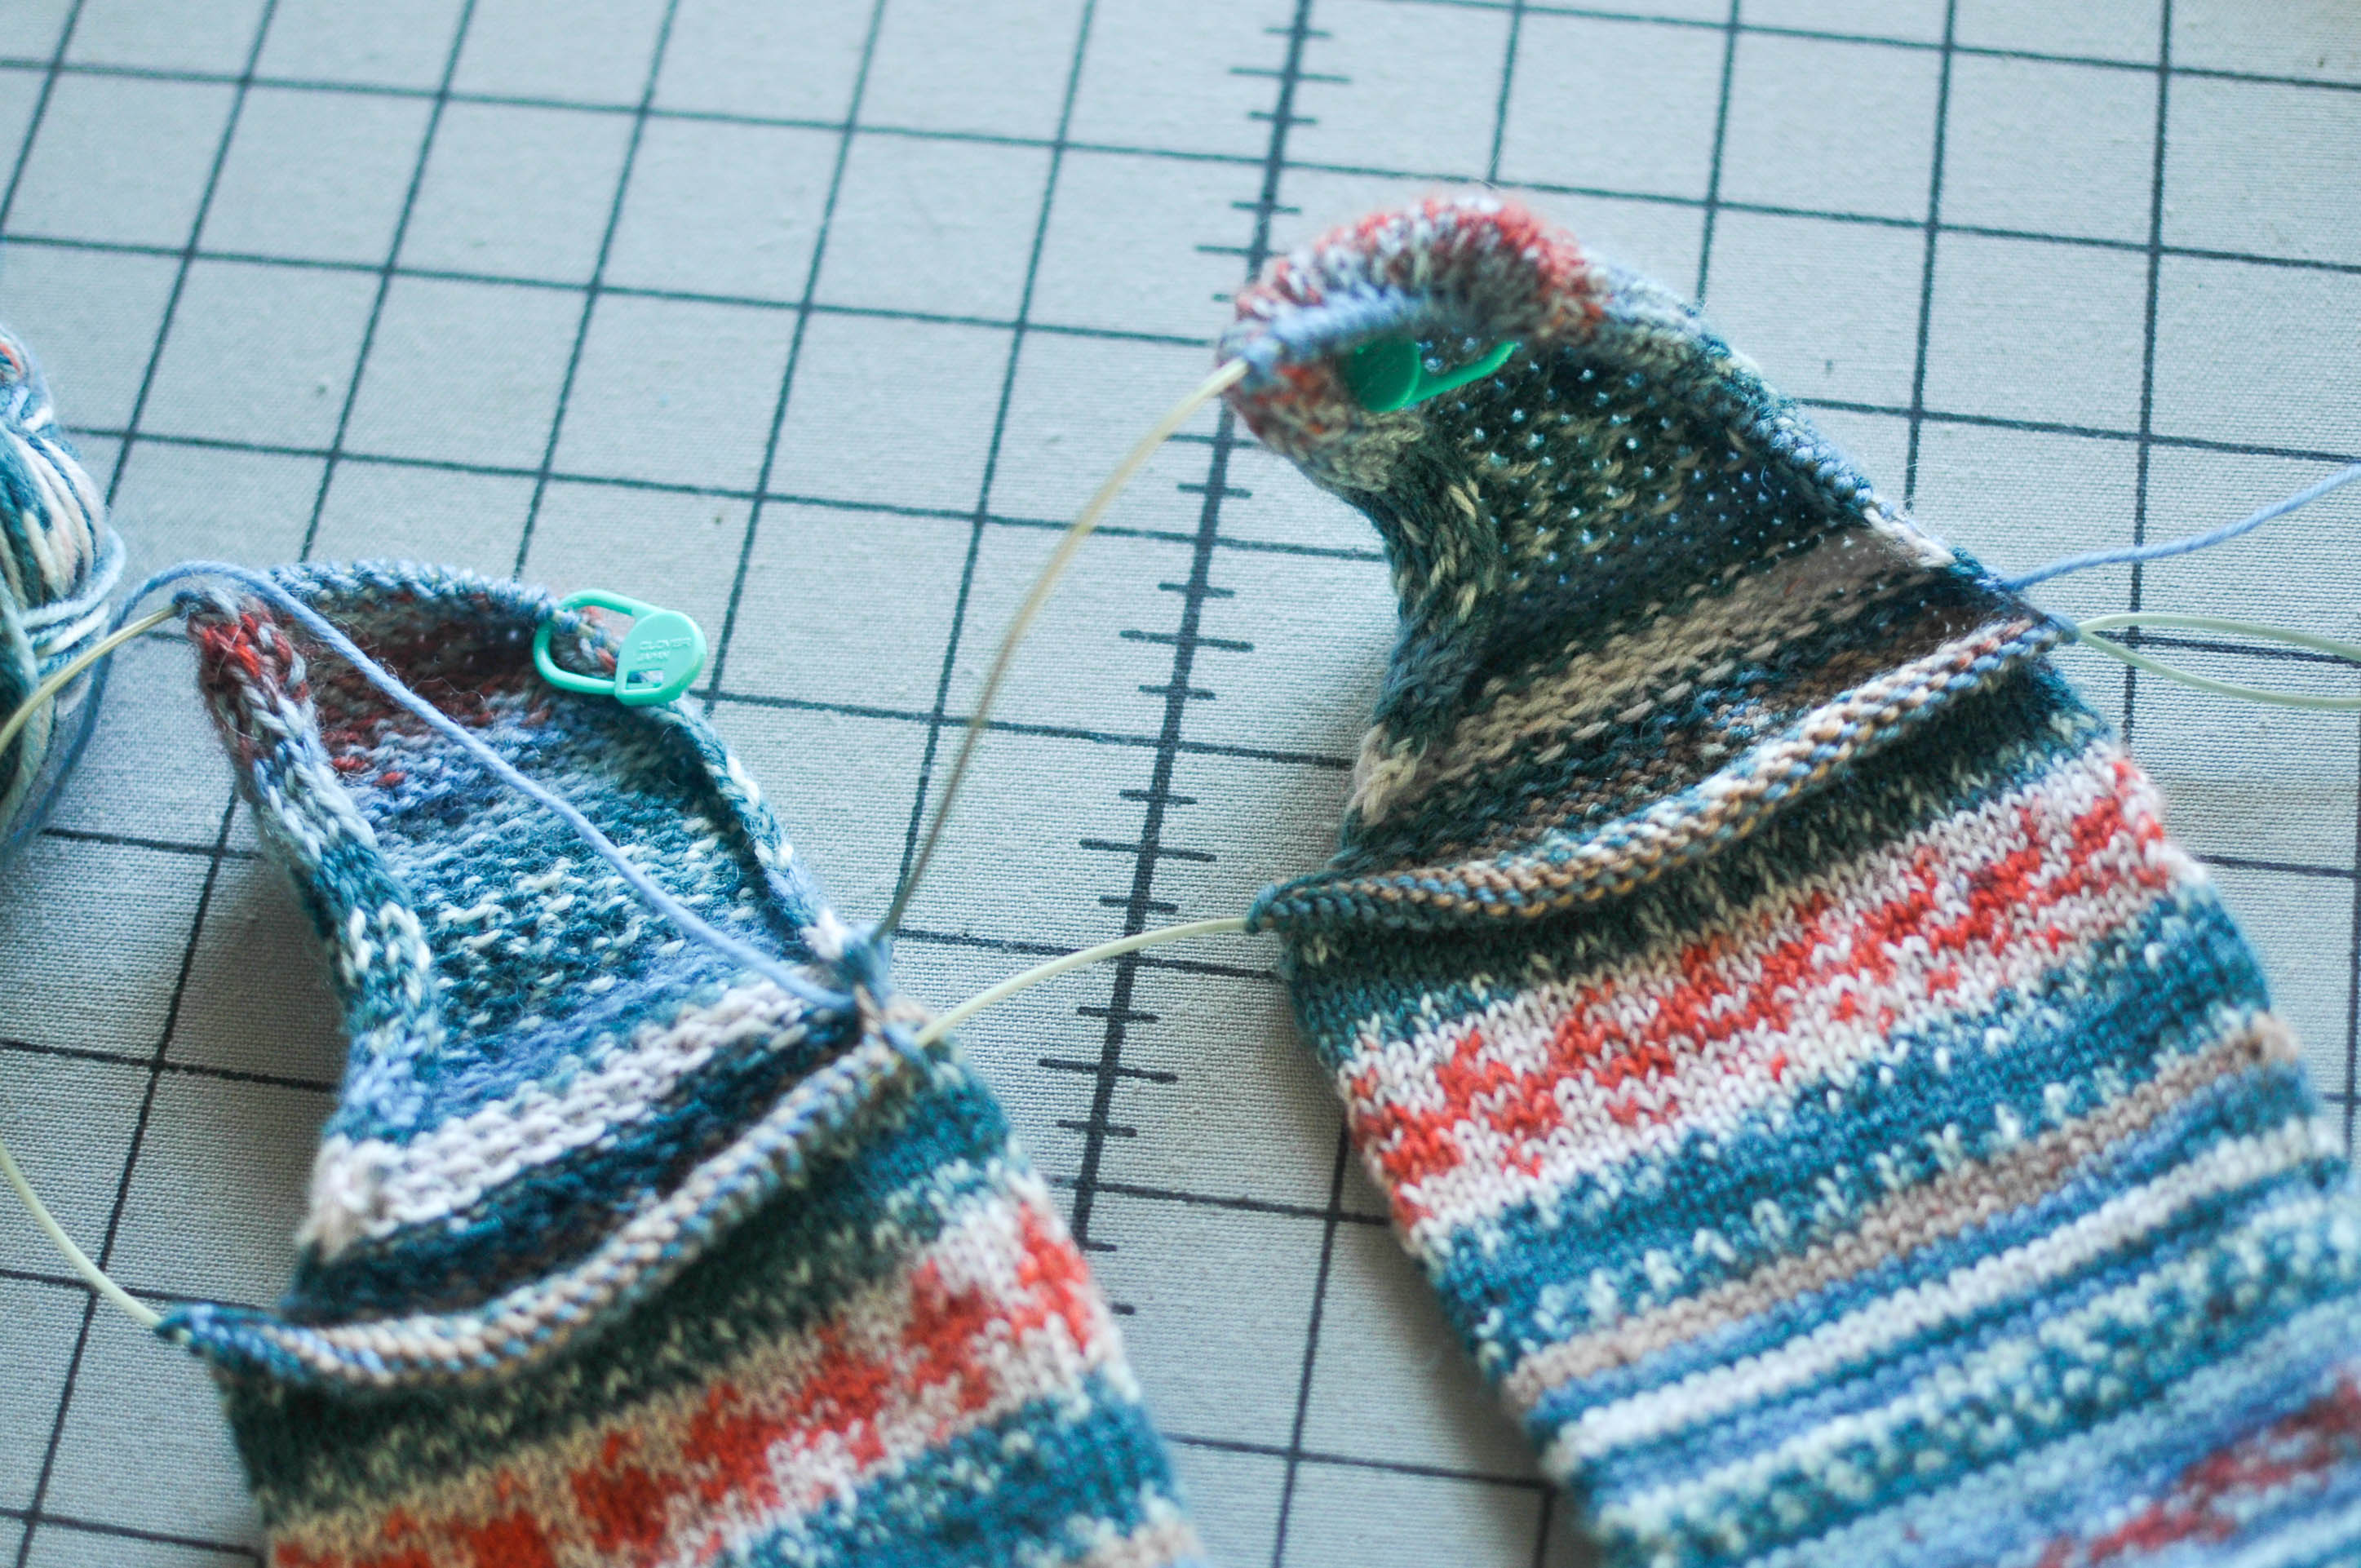 Let’s call the sock on the left side of the picture Sock A. If you’re working both at a time, you should have done both heel flaps at the same time, followed by a heel turn and left gusset pick up on Sock A, then a heel turn and left gusset pickup on the next sock. If working both at once you’re ready to work across the instep of both socks.
 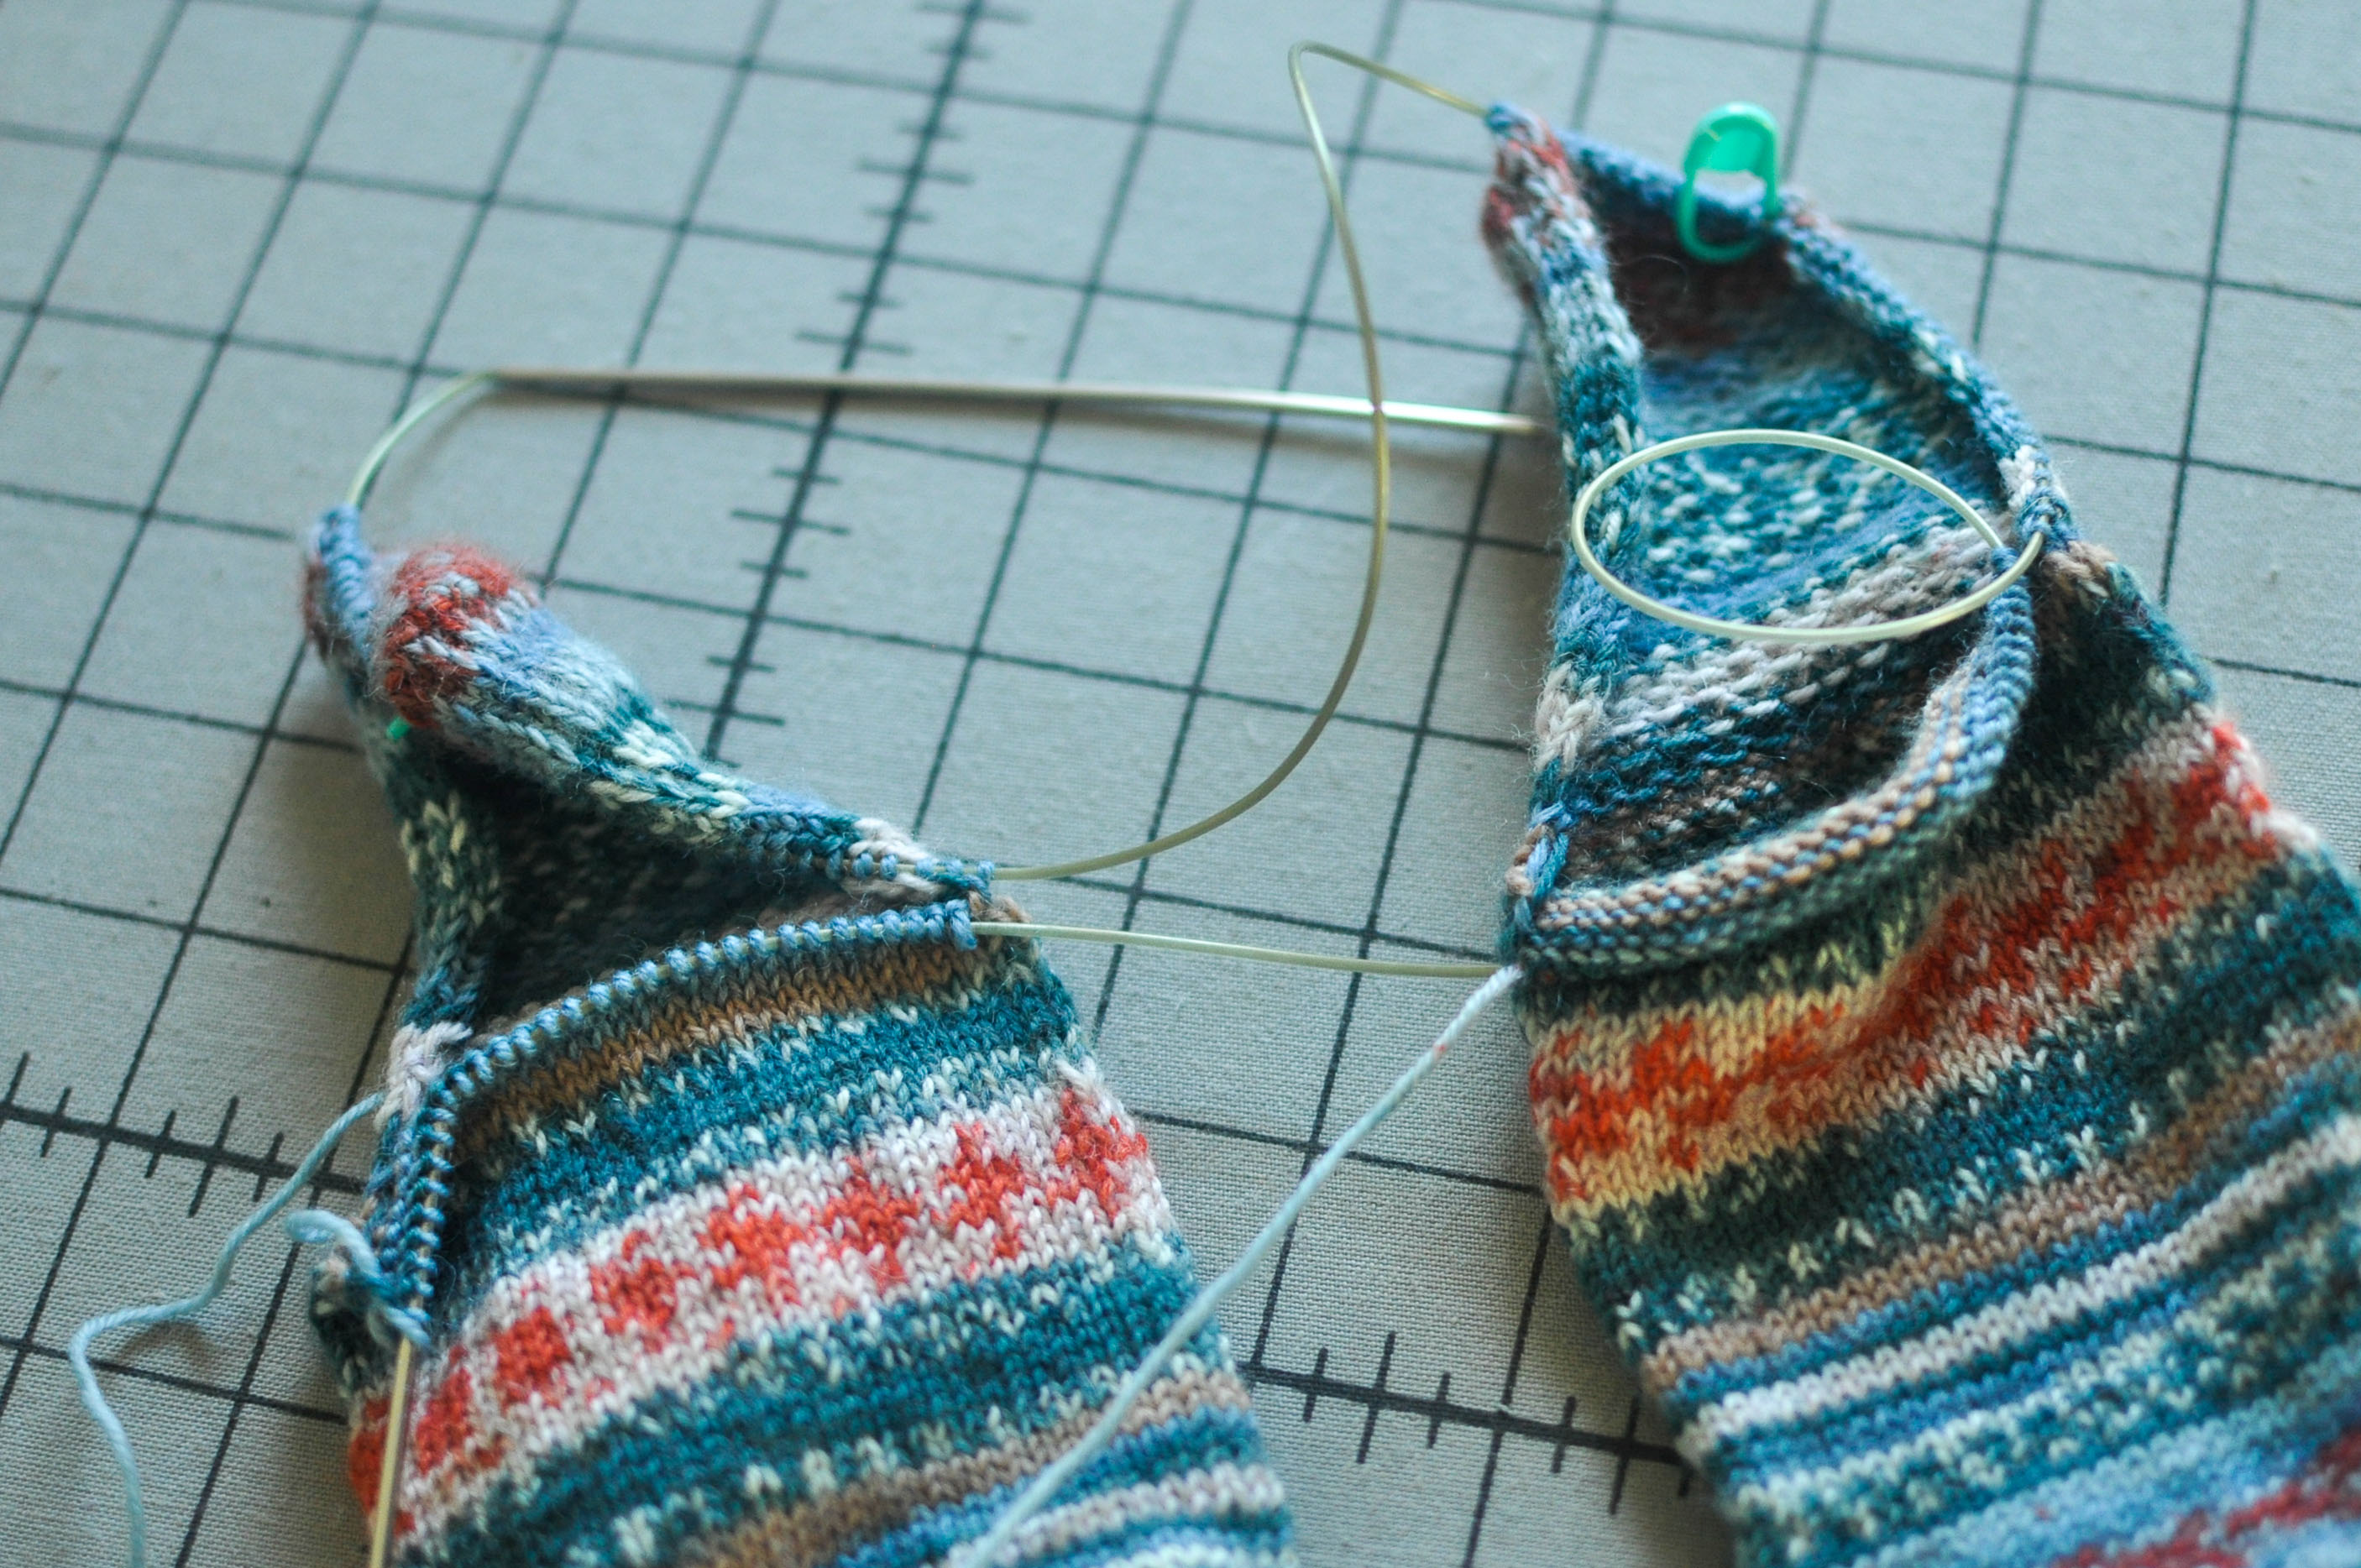 Following that, you pick up the right gusset stitches on Sock A. Don’t forget to pick up some legs of stitches below to close the gap between your instep and gusset stitches.
 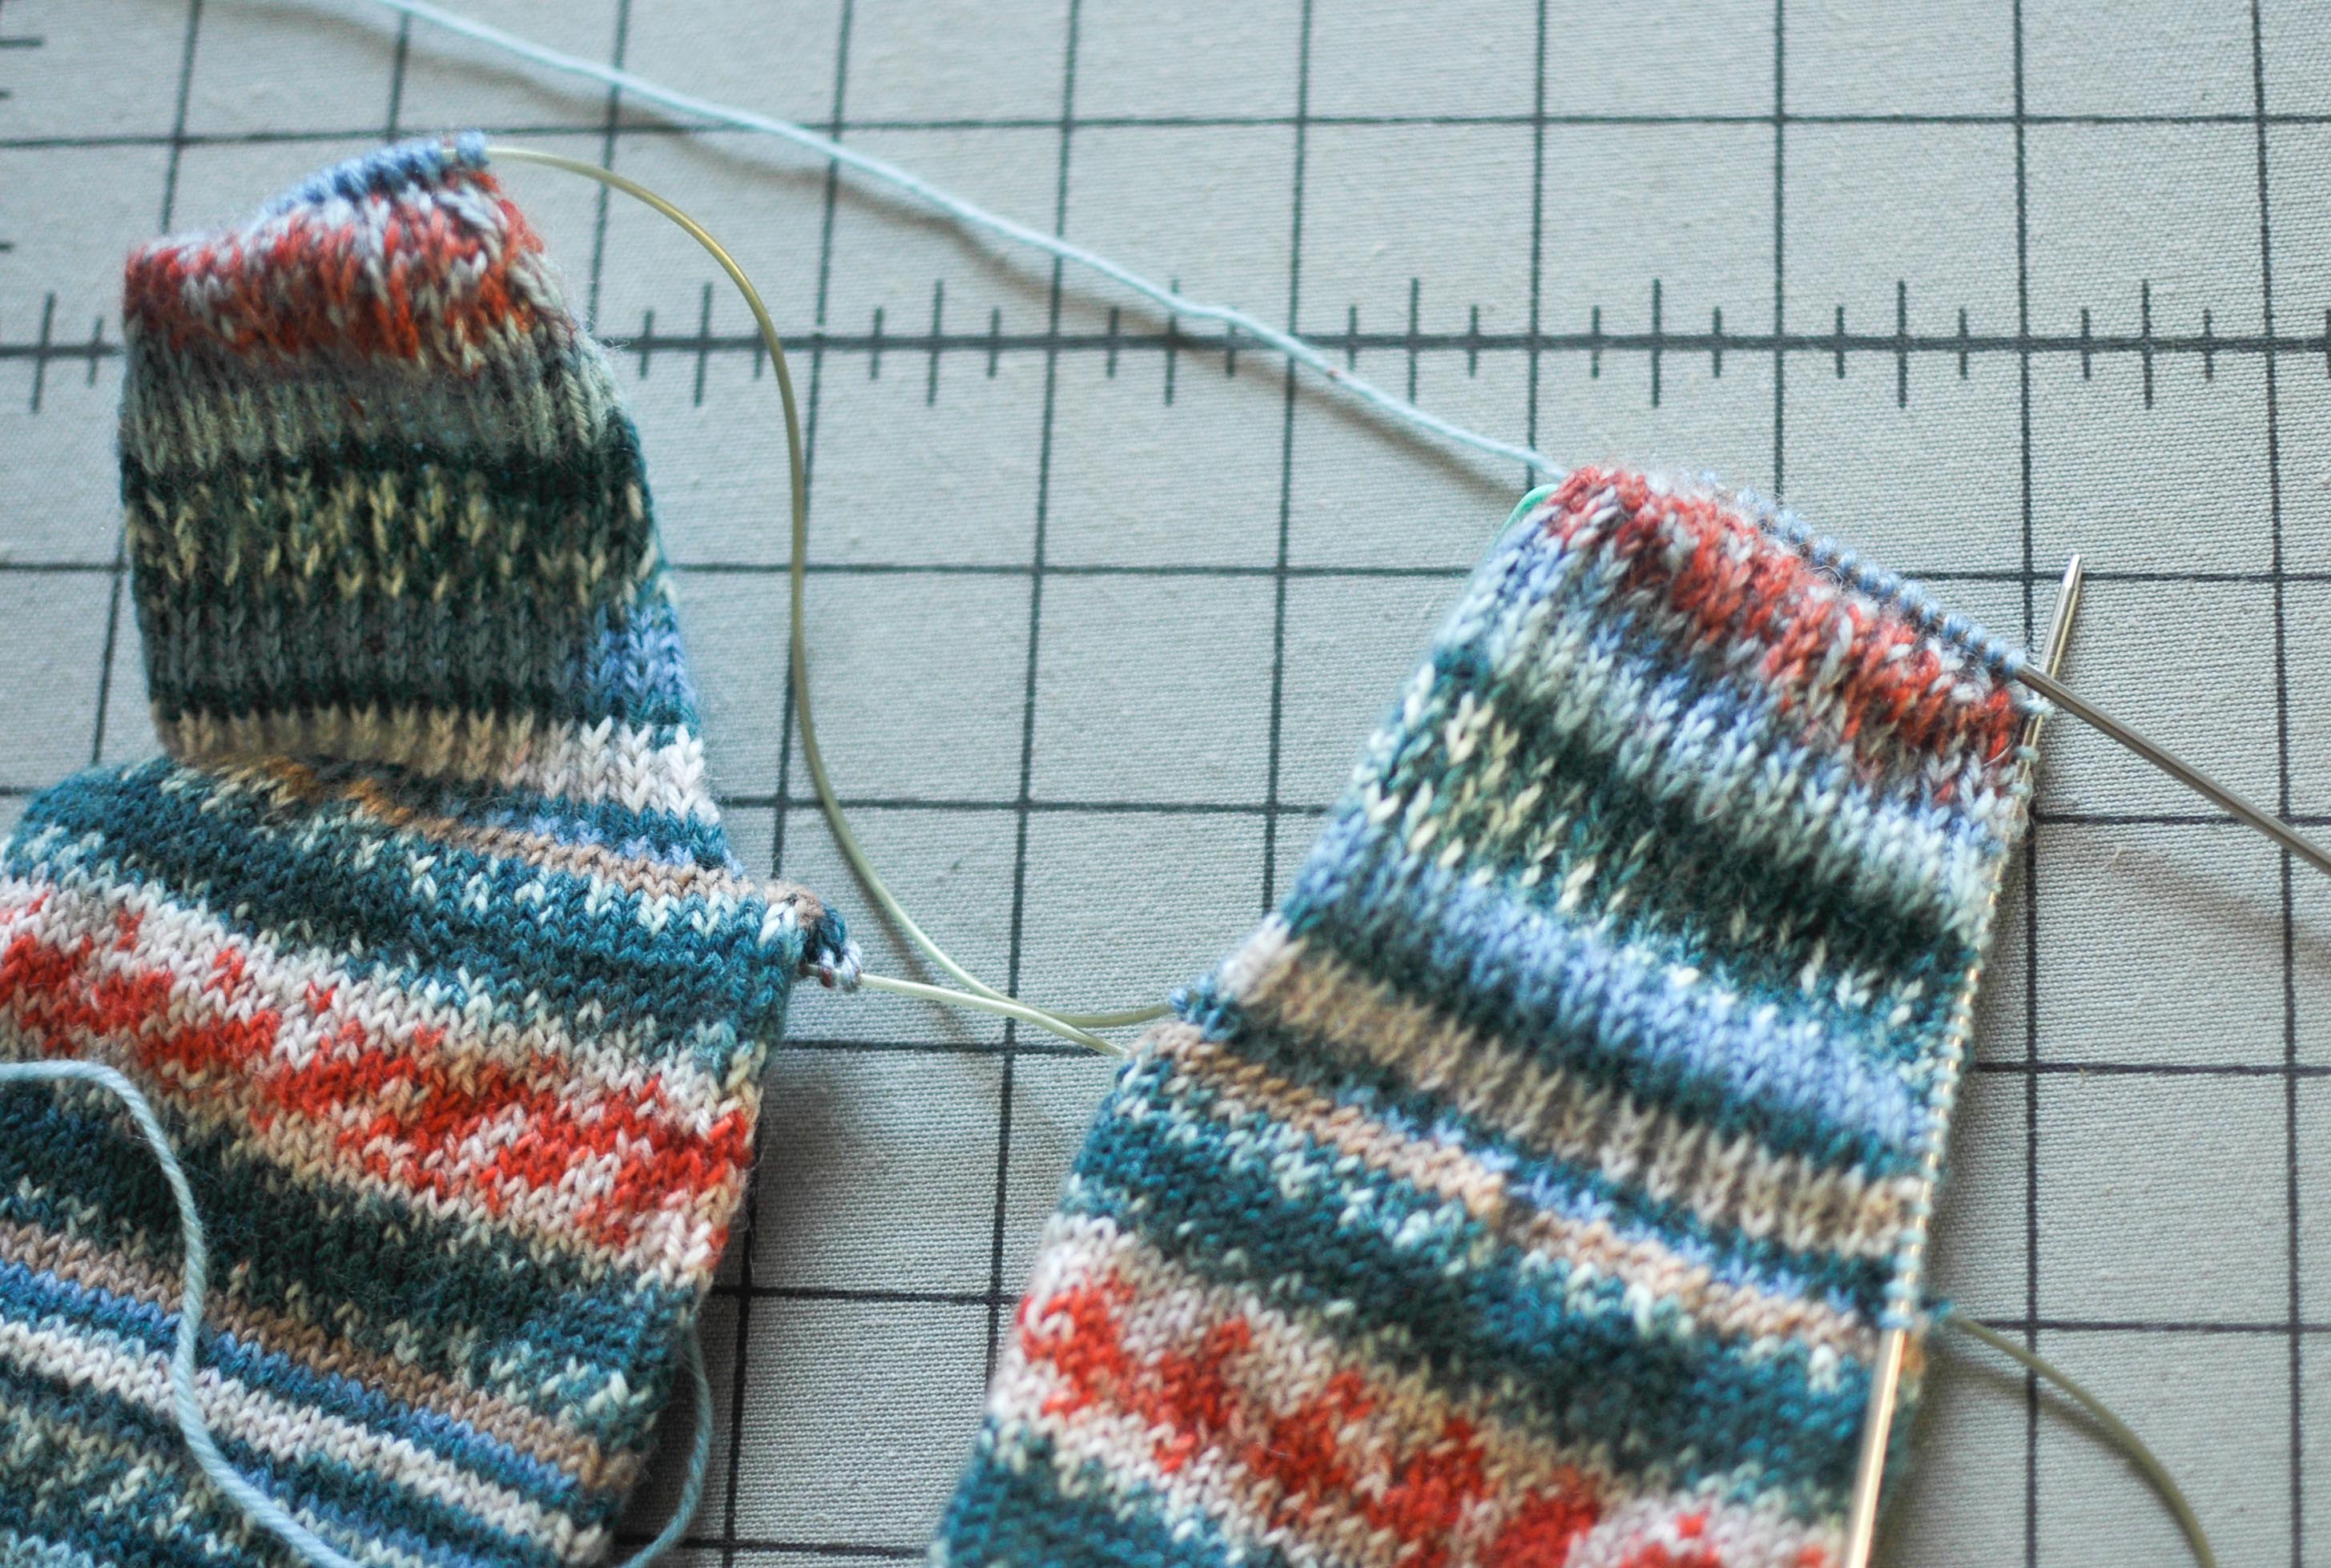 In the picture above we’re looking at the sole, so Sock A is on the right. You have your right gusset stitches picked up, so you can place a marker between these and the back of heel stitches like you did for the left gusset. Then go ahead and work the back of the heel stitches.
 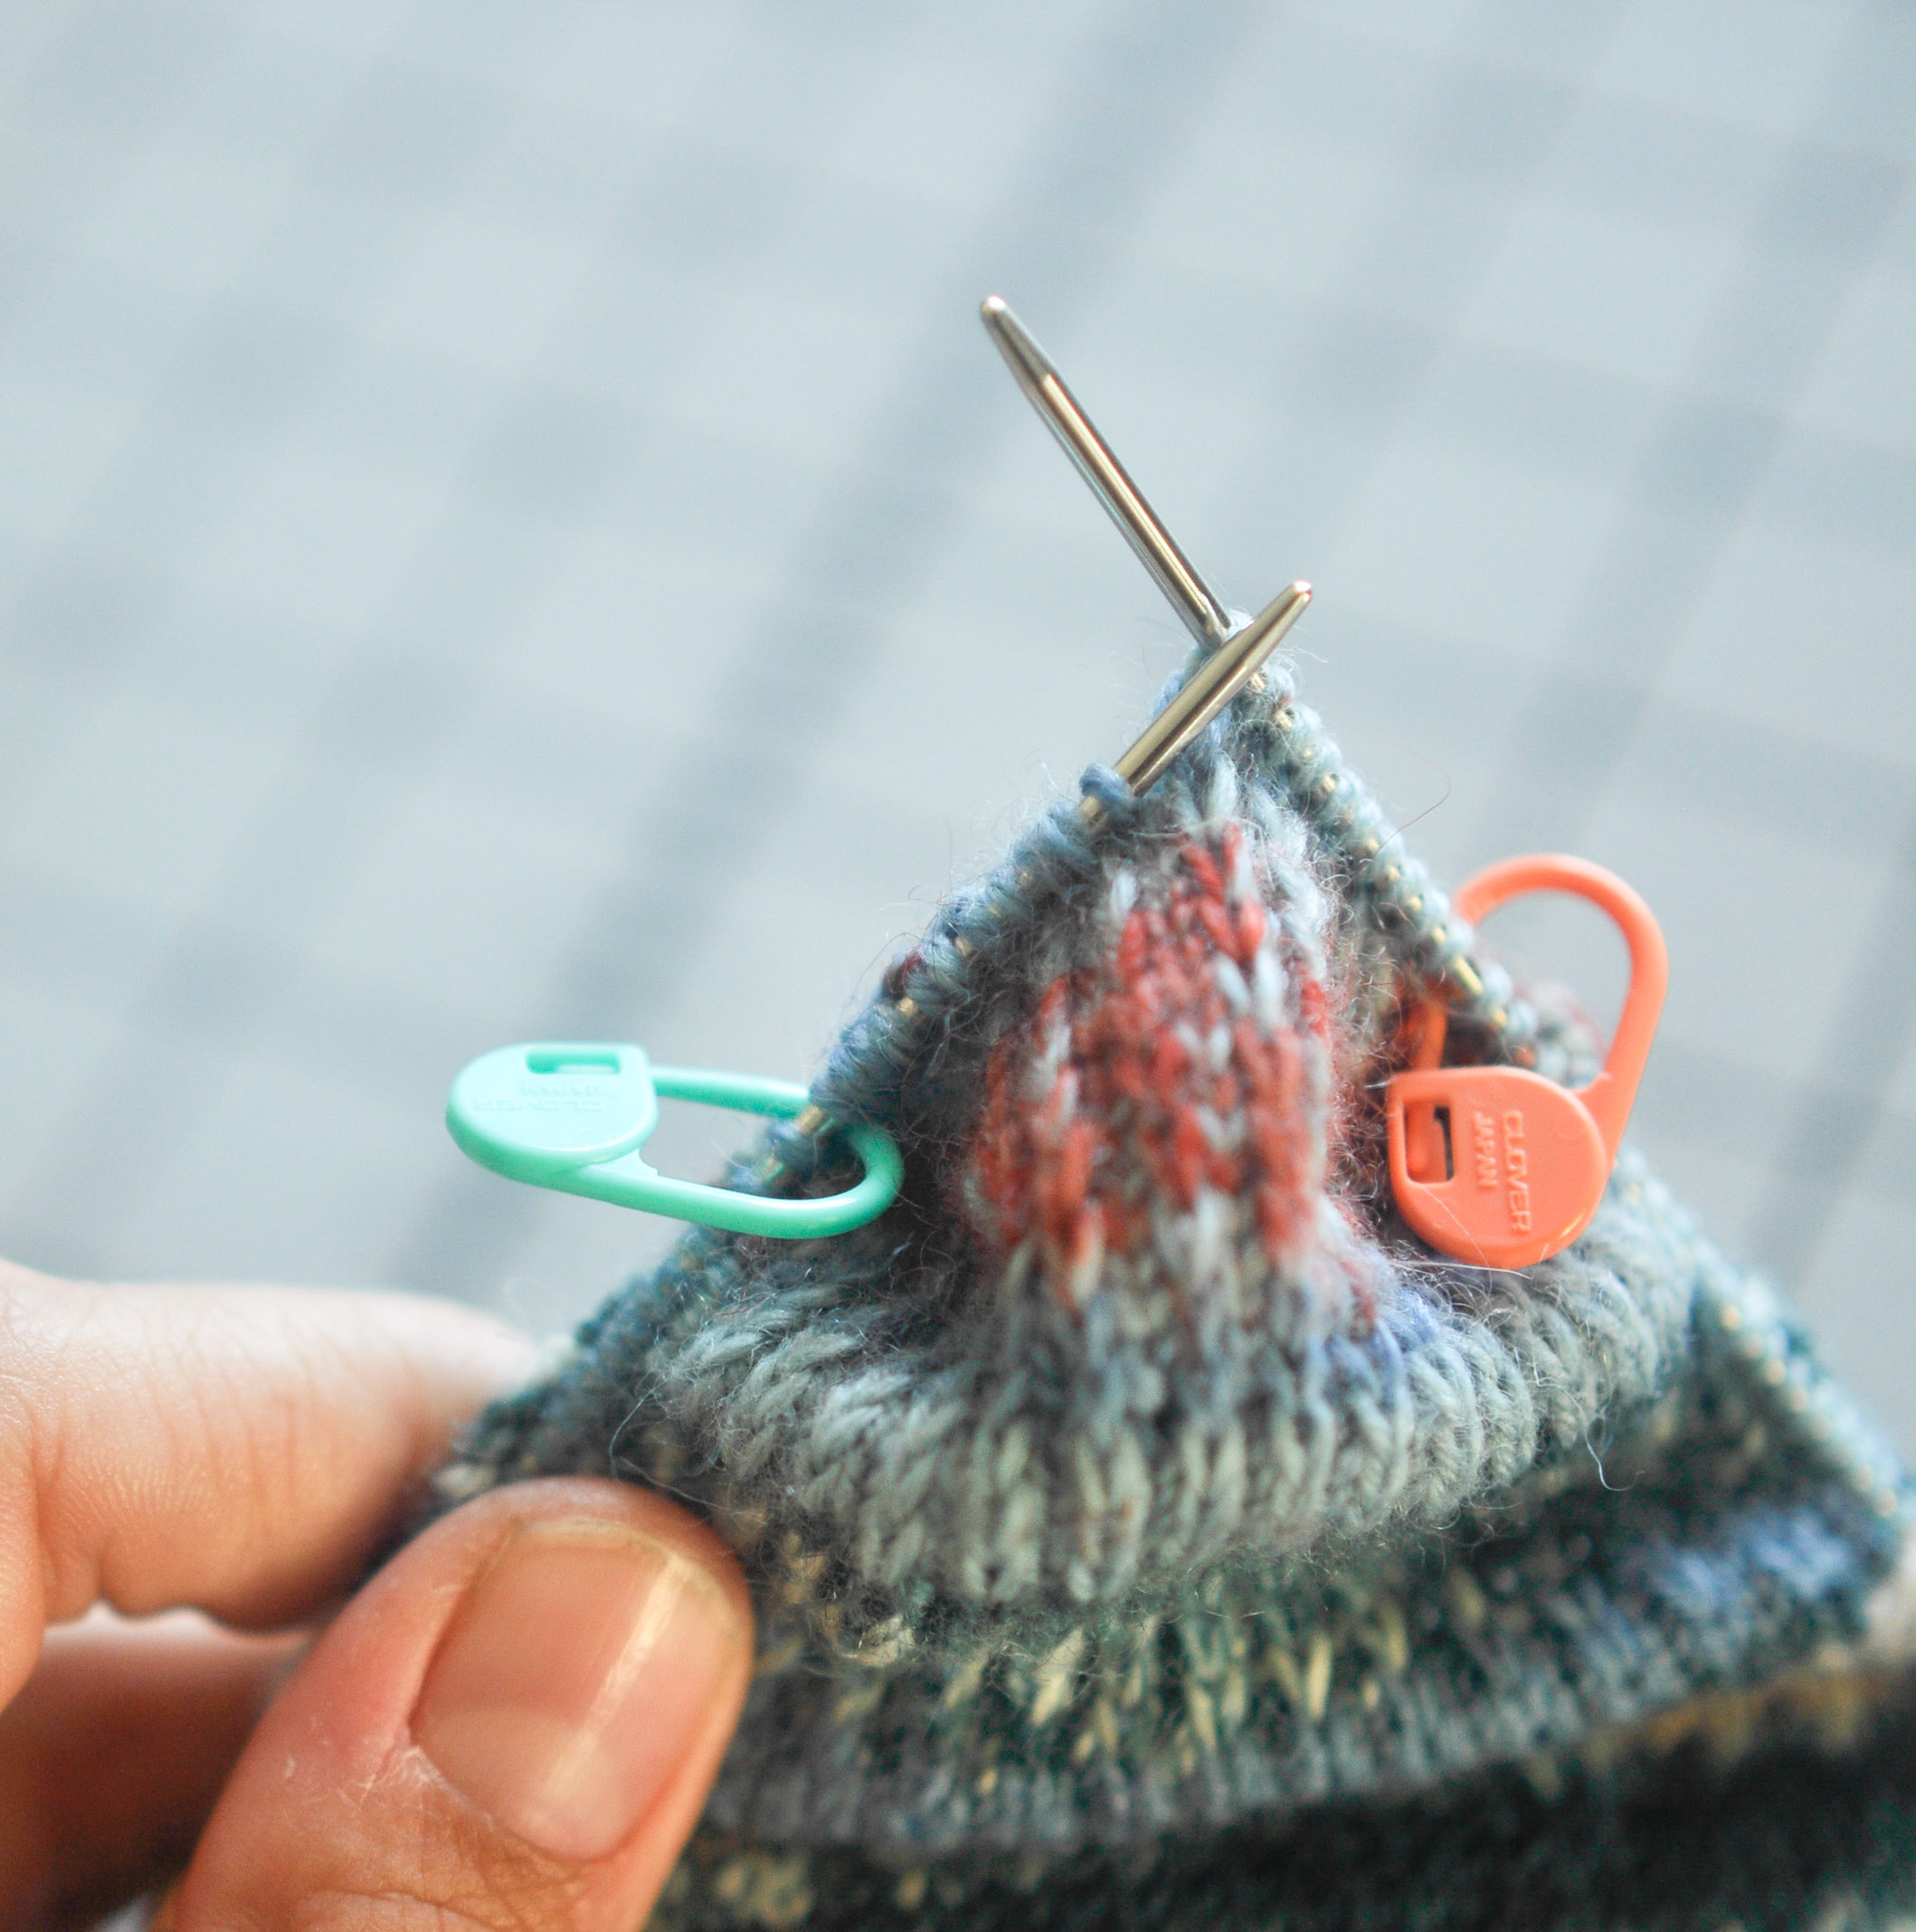 To stay in pattern you’re now going to be having an all knit row alternated with your slipped stitch row. Right now you’re knitting. If you forget just look at the last row and see if it is a nice neat row or a slightly more jumbled slipped row and do the opposite.
 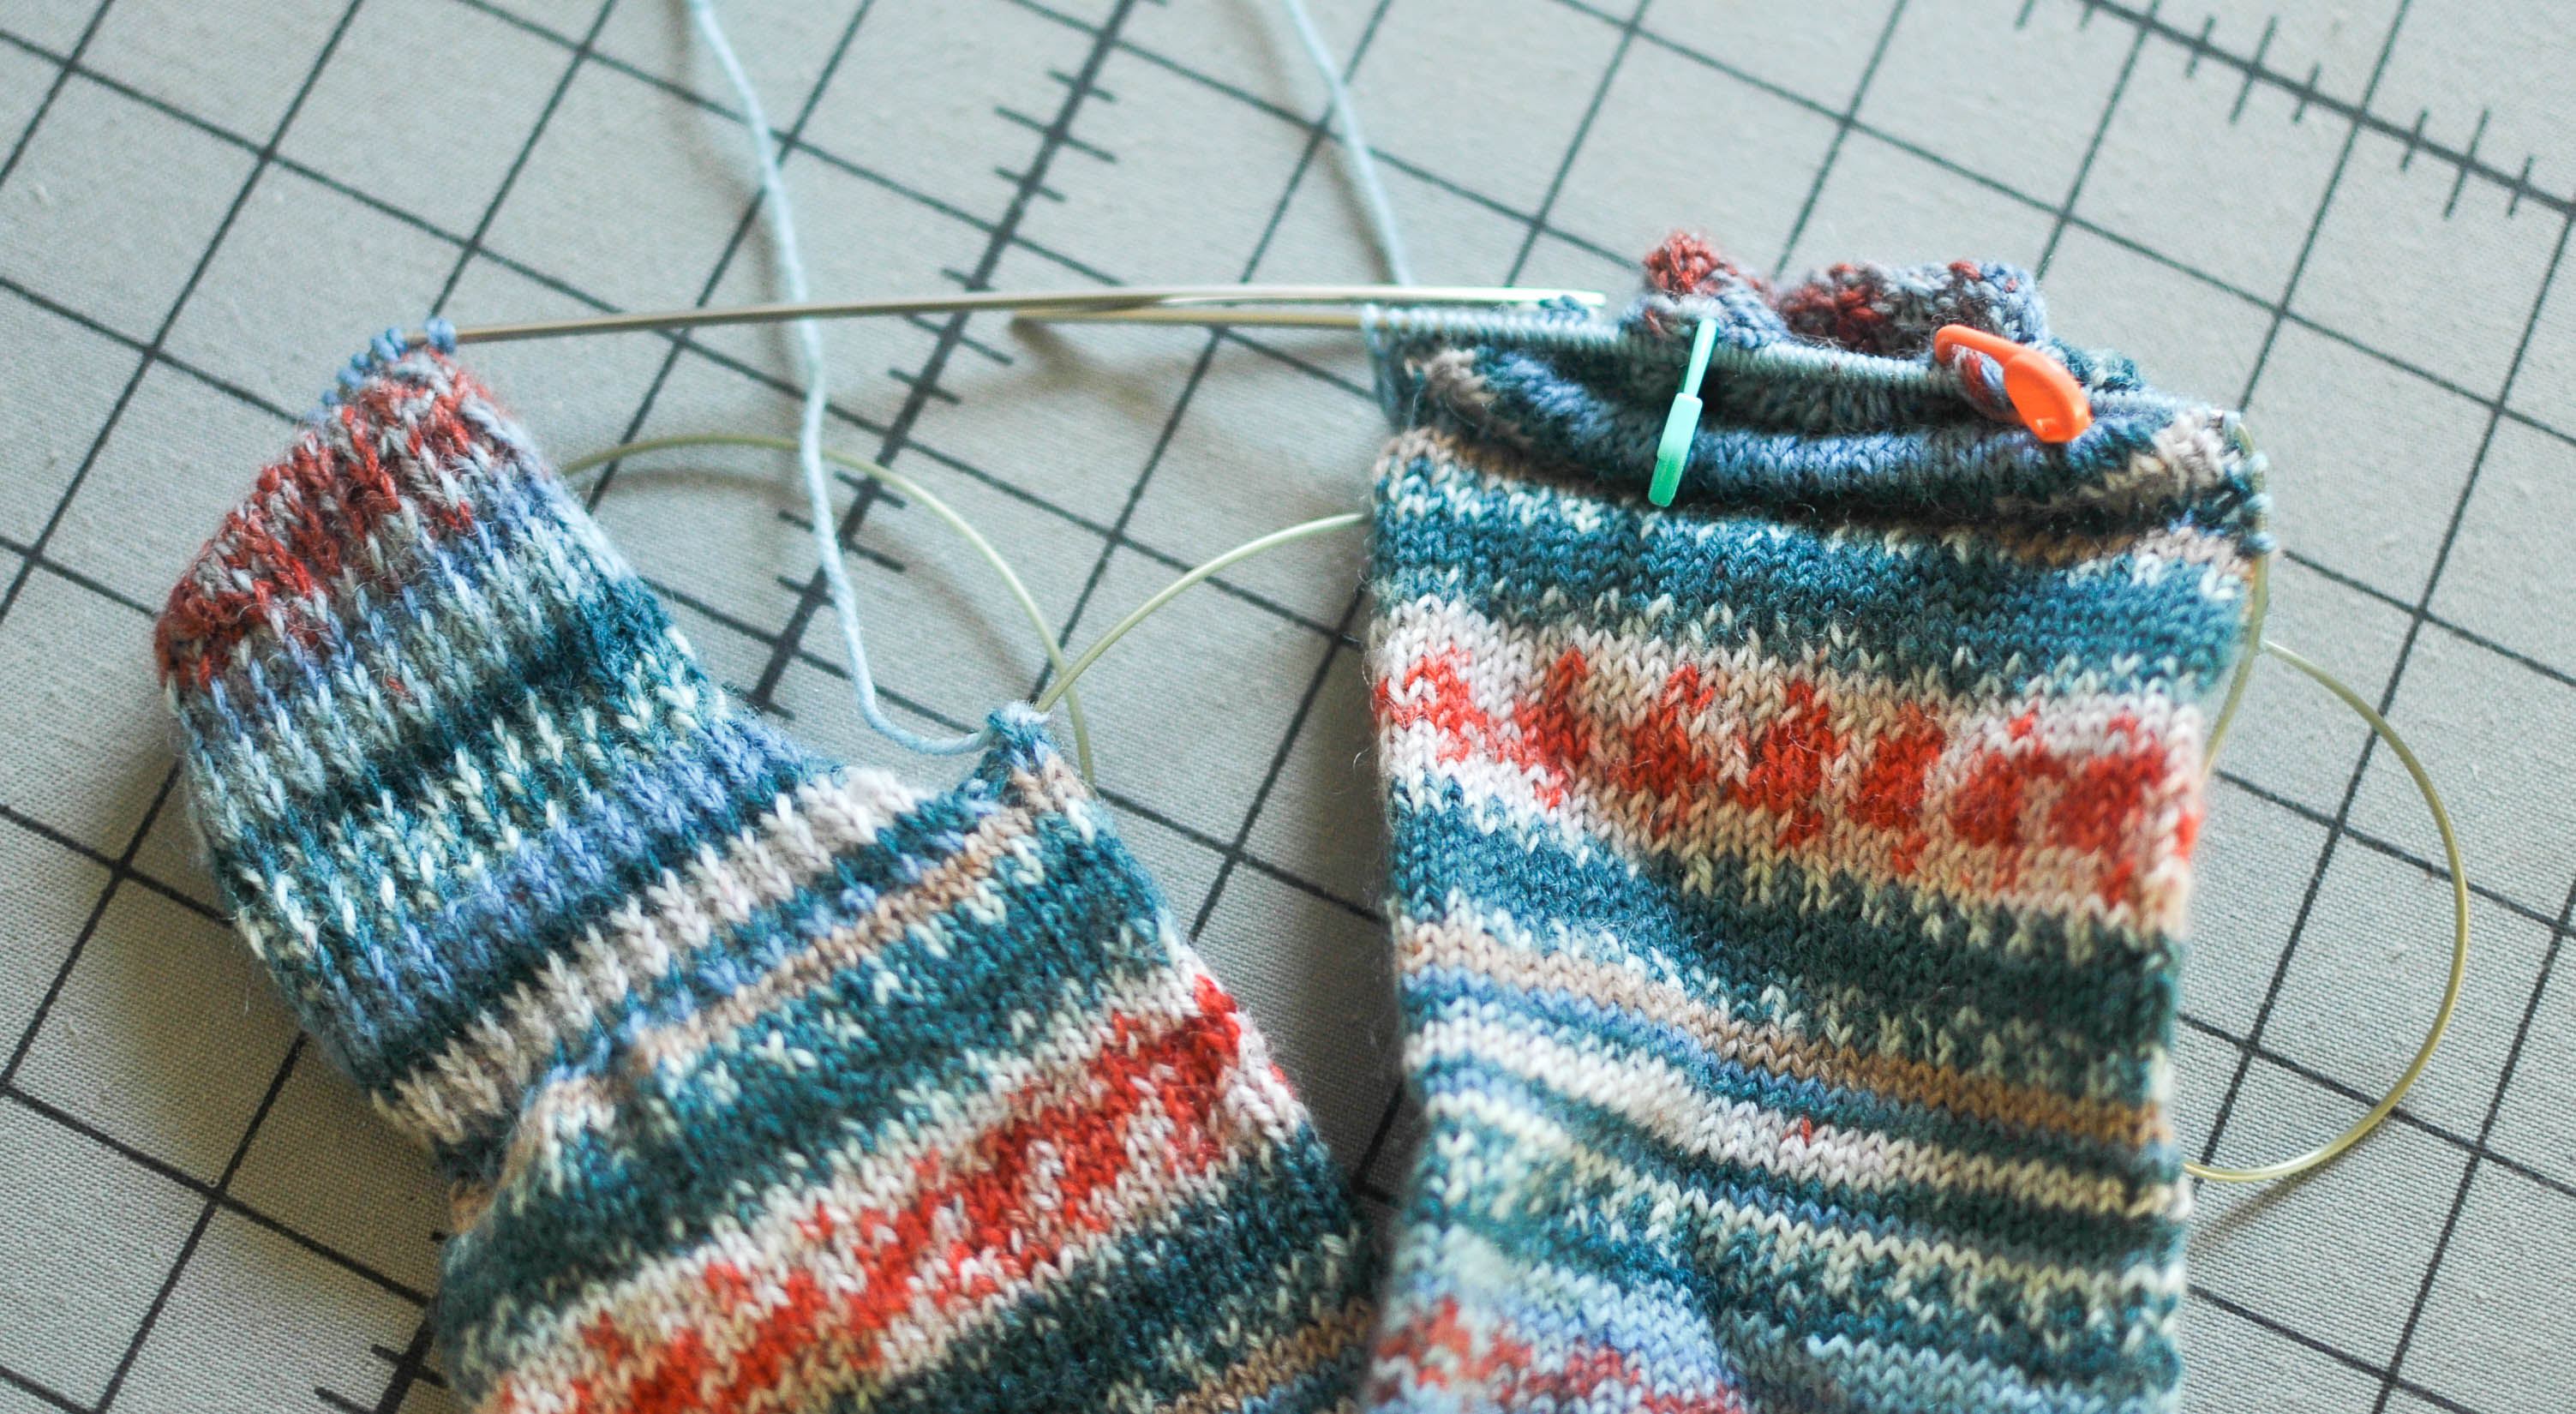 After working the back of heel stitches, go ahead and work the left gusset stitches on Sock A (sock on the left). Your Sock A is going to have a whole lot of stitches smooshed on the needle like shown above. Pick up the right gusset on the next sock. Let’s call that one Fred.
 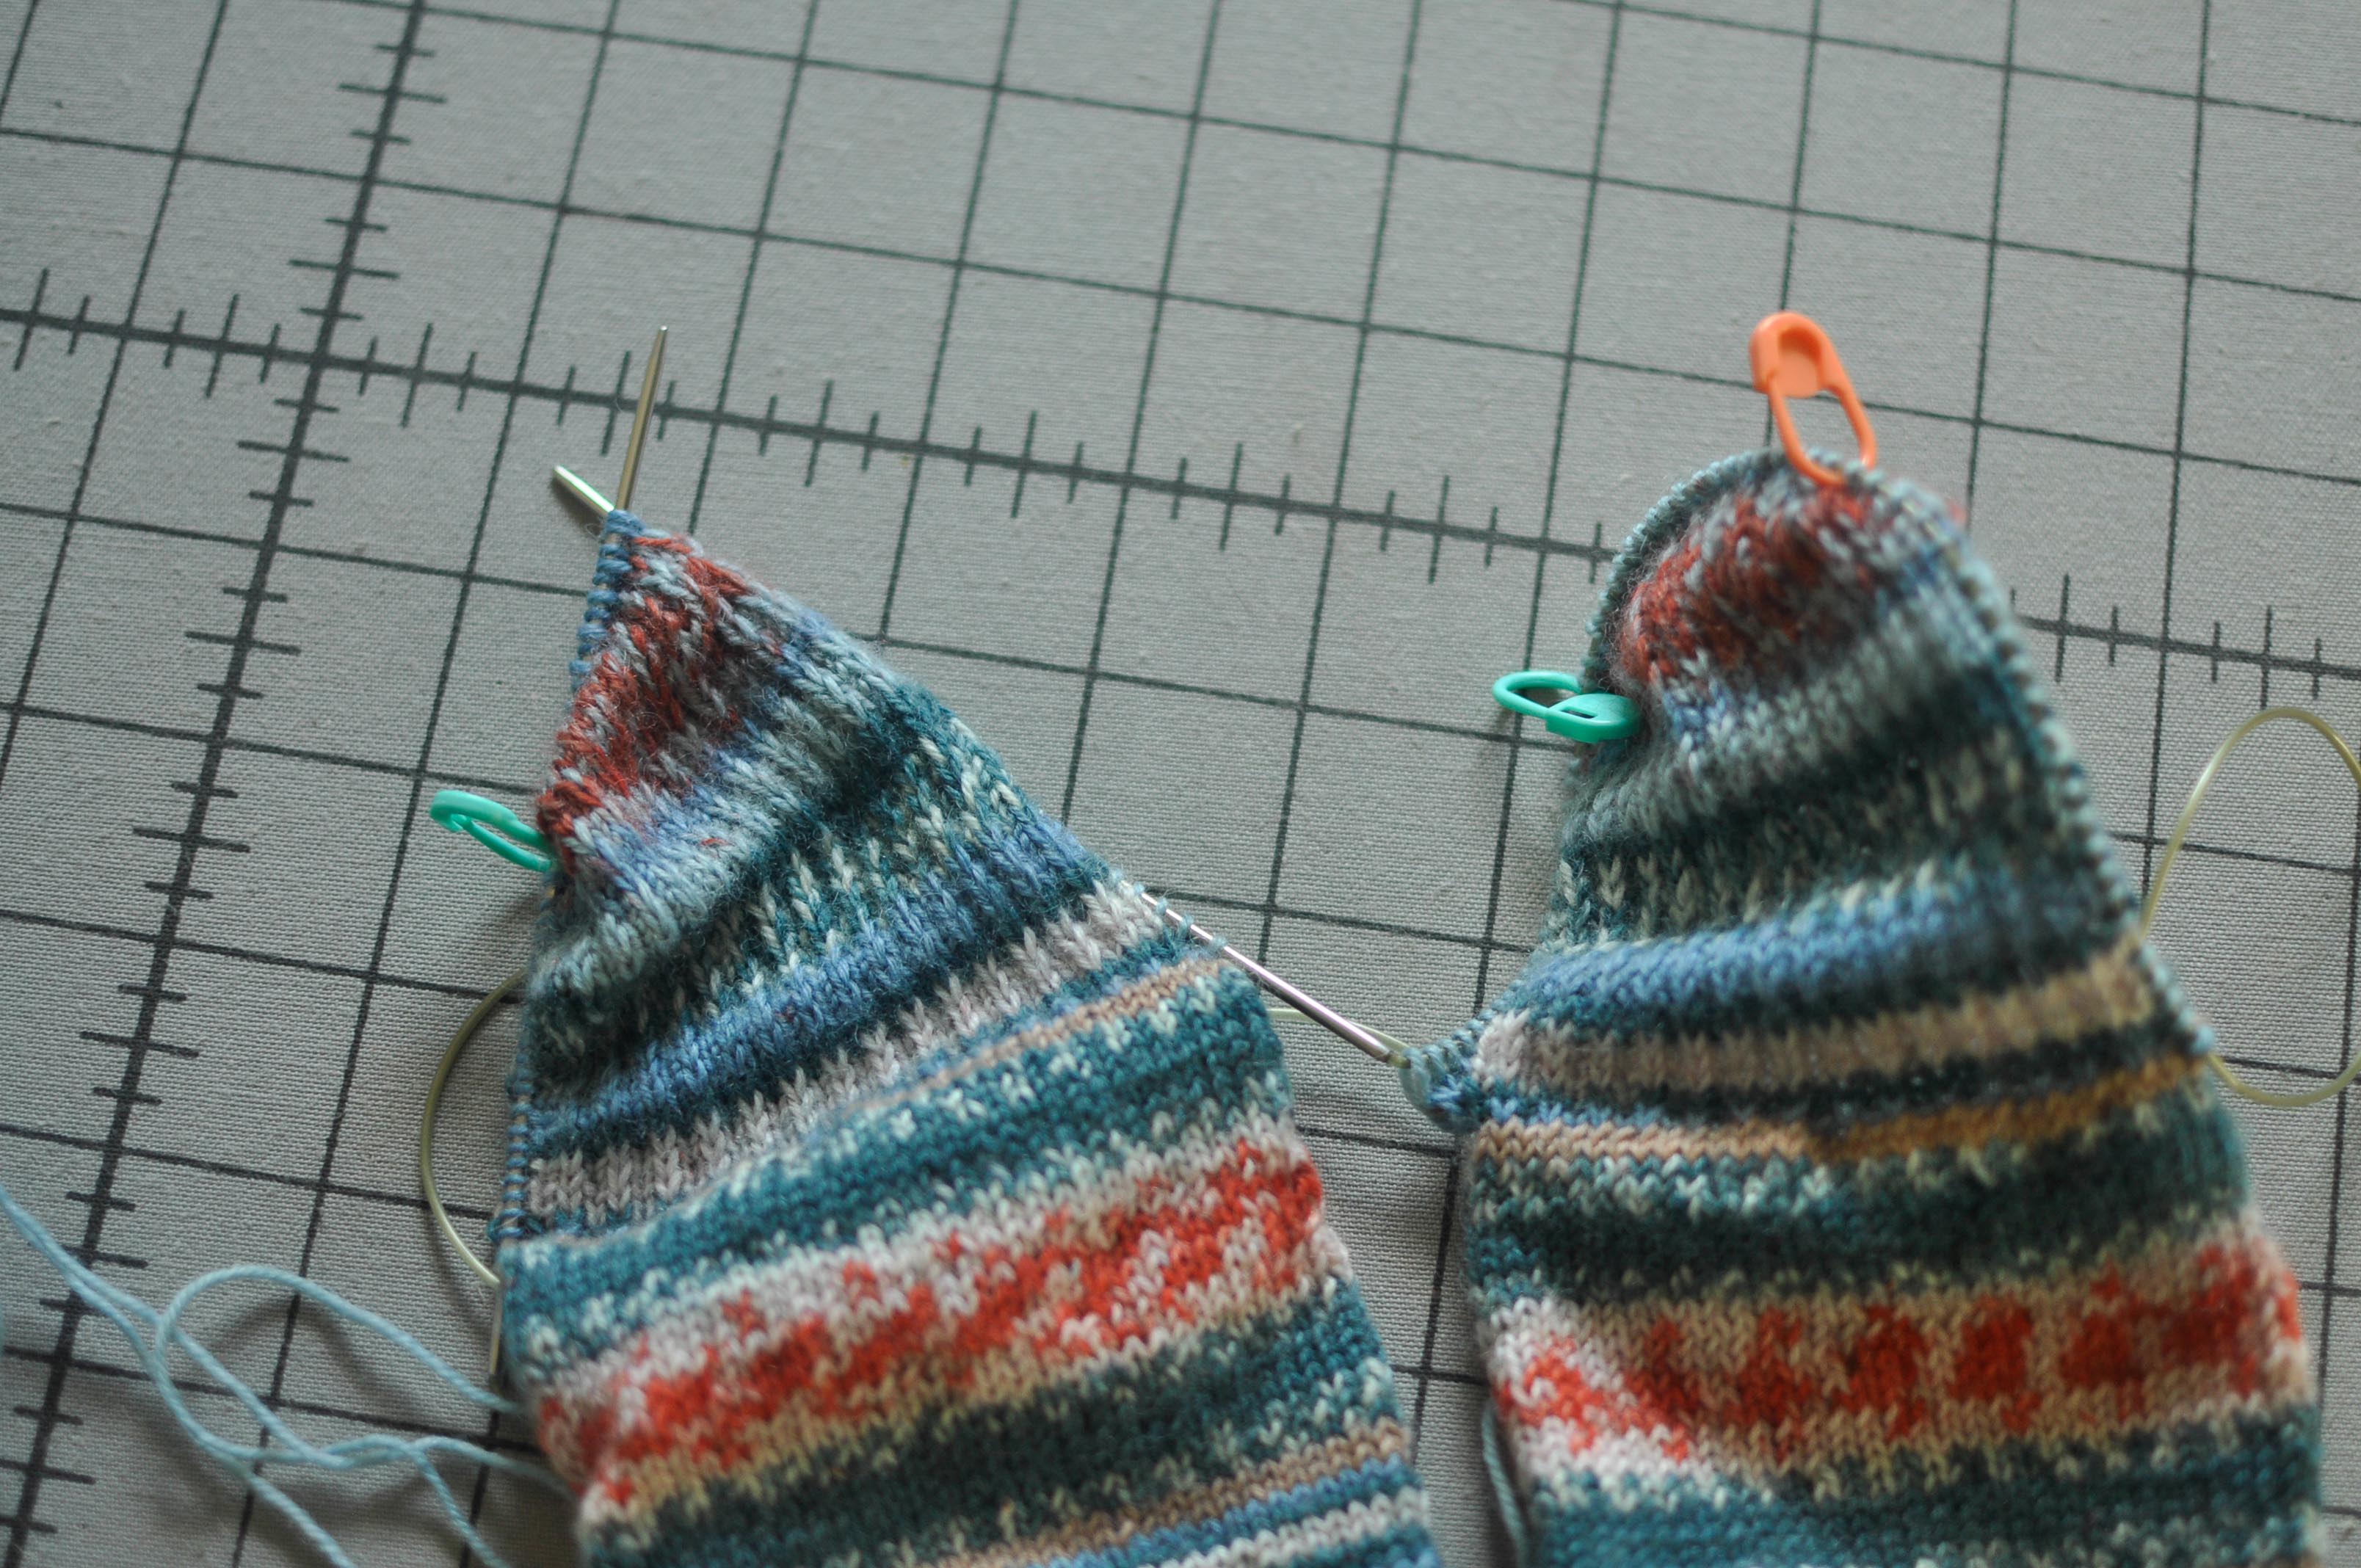 Place a marker between the gusset stitches and back of heel stitches on Fred as well, and work across until you’re at the instep stitches on both socks.
  Look at the beautiful thing you’ve done. Get a drink. Some of you might need one by now.
  Here’s the flip side of that gorgeousness. It’s starting to look like a sock, right? The rest of the pattern is much easier from here. At this point you alter a decrease row (making a decrease on each gusset one stitch away from the instep stitches) with a plain knit row. I like to make it so that my plain knit rows are also plain knit rows across the back of the heel stitches to require less concentration (therefore less ways to f@#k things up). Any of my patterns can take the rest from here.
I hope you have enjoyed this knowledge.


I’ve used your heel (from your Earlybird Socks) in the last two pairs of socks I’ve made. I’d always avoided heel flaps previously, preferring gusset and short rows but some of my older pairs are wearing very thin. I love the way the heel flap snugs in at the back of the ankle and provides thickness underfoot as well as at the back of the ankle. I will be knitting all my socks like this from now on!
Amazing! I have wanted to knit socks for so long and felt scared, but I think I am going to give it a shot!
Great tutorial! Wha t yarn did you use…I love the look.
I forgot that info! Regia in the Arne and Carlos set. Colorway is Summer Night.
Thanks for the detailed explanation and pics. I’m ready to try (again) to make a pair of socks.
Awesome! I’ll try to use that technique with my next socks! Thank you!
Excruciating detail! Wow, thanks so much! Toe up, two at a time is the only way to go.
Thanks for the tutorial. I usually do a garter st short row heel but sometimes it disrupts the pattern too much. I will try this method. Really nice sock yarn.
Oh my GOD. This is the heel I’ve been looking for. I recently did my first pair of toe-up socks and the heel was killer, I wanted my heel-flap, short-row heel from my top-down socks! Thank you for this!
Thanks for the tutorial. Beautifully documented. Your blog got me into toe-up socks (and pinwheel blankets) and I love the reinforced heel (and so does the hubby). I have moved to a variation of the heel but may come back to this one to see how it compares.
Never done it this way. Now I am eager to try it.
Very beautiful colors!
This is such an awesome post
I’ve knitted a vanilla, toe up sock once. It’s fit came out perfect for my narrow, chicken feet. I wonder how so when cuff down comes out slouchier.
Cassie – I took my very first sock class from you and your standard two-at-a-time toe-up sock pattern is the only one I ever use and just change up my yarn and leg patterns. This is my favorite heel for sturdiness and fit. Thanks for writing this up in your blog so I’m able to share with my new(er) knitting friend.
Thank you for the tutorial! Crocheting is my thing, but knitting is starting to get into my veins… and sock heels are my kryptonite!
This is upside down.. the slip stitch section goes on the back of the heel, not under the heel.
This heel actually wraps from underneath the heel to the back of the heel. It covers both areas for extra durability. 😉